Our story so far: A new phase of construction arrived with spring as we renovated a 126-year-old Methodist church into our home.
# # #
The renovation phases in our project didn’t always have clearly defined beginnings and endings. Phase One, demolition, clearly began the day we purchased the church, but it continued into the mechanicals phase and beyond as we discovered new walls, windows and cubbies that required dismantling before we installed something new.
Similarly, Phase Three of drywall, paint and flooring began as soon as the drywallers finished demoing the sanctuary ceiling. They immediately drywalled and painted it, and the ceiling simply overlooked all the work being done during Phase Two of framing and mechanicals.
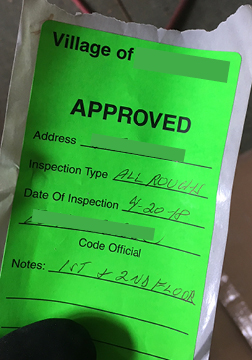
But we treasured a clear marker at the end of framing and mechanicals. The building inspector officially approved our rough-in. Approval! This was necessary in order to proceed with covering the studded walls which contained all the precious and expensive—but unimaginative—plumbing, wiring and HVAC ducting. Finally, the dirty demolition phase and boring mechanicals phase were behind us. Let the fun begin!
# # #
Tomorrow: Measures of our success. Read about them here.
Our story so far: As reality has caught up with this blog about converting a 126-year-old Methodist church into our home, I’ve run across a few odds and ends that occurred after I wrote about the subject initially. That’s how it goes with a real-time memoir. Sometimes stuff happens after publication. So this week, I’m sharing a few little stories that will ultimately be integrated into the relevant location in the memoir. Think of this as the time in the novel—especially a mystery novel—when you page back to reread a few passages to remind yourself about what’s going on. Here’s an update for Chapter 21.
# # #
To wrap up the balcony, Tyler constructed cross joists from the pergola to the north and south walls of the church. These were narrower than the center part of the balcony in order to clear the spiral stairway on the north side and the front window on the south. With the science part complete, a bit of art was necessary to draw the main part of the balcony together with the narrow part; Tyler planned a dramatic scallop and swoop to soften the edges of the balcony.
You-Can-Call-Me-Al was an even better carpenter than he was tiler. He picked up in execution where Tyler’s grand plans left off, and he built the most graceful sweeps constructed of wood you’ve ever seen.
South scallop and swoop.View of the sweeping balcony from the north.
Our story so far: As reality has caught up with this blog about converting a 126-year-old Methodist church into our home, I’ve run across a few odds and ends that occurred after I wrote about the subject initially. That’s how it goes with a real-time memoir. Sometimes stuff happens after publication. So this week, I’m sharing a few little stories that will ultimately be integrated into the relevant location in the memoir. Think of this as the time in the novel—especially a mystery novel—when you page back to reread a few passages to remind yourself about what’s going on. Here’s an update for Chapter 20.
# # #
Those cute niches flippers always build into the shower wall on HGTV look so pretty when the house is staged with candlelight and floral arrangements, but in practical use the shower niche is an eyesore of mismatched face wash and deep conditioners.
This image of the shower-in-the-rough is taken from the bathroom doorway. Initially, the shampoo niche was planned for the wall hidden by the floor-to-ceiling partial wall.
In the initial design of our custom shower, we intended to hide our extra-large shower niche in the corner, mostly hidden by the wall to which the glass door would be attached. At least our shampoo would be mostly obscured to looky-loos poking their heads inside our master bath to get a look.
Instead, the shower niche (extra large, of course) would be hidden inside the partial wall, completely hidden from the bathroom doorway.
But then we discovered the pre-engineered insets wouldn’t fit between the studs on that wall. You-Can-Call-me-Al offered to create a custom niche, which was a reasonable solution until Tyler discovered the inserts would fit neatly inside the glass-door wall. Even better, our niche would only be visible from the shower. Ta-da! No more ugly shampoo cluttering the impressive view of the shower.
Happy accident.
# # #
Tomorrow: What do you mean, balcony swoop? Check it out here.
Our story so far: As reality has caught up with this blog about converting a 126-year-old Methodist church into our home, I’ve run across a few odds and ends that occurred after I wrote about the subject initially. That’s how it goes with a real-time memoir. Sometimes stuff happens after publication. So this week, I’m sharing a few little stories that will ultimately be integrated into the relevant location in the memoir. Think of this as the time in the novel—especially a mystery novel—when you page back to reread a few passages to remind yourself about what’s going on. Here’s an update for Chapter 19.
# # #
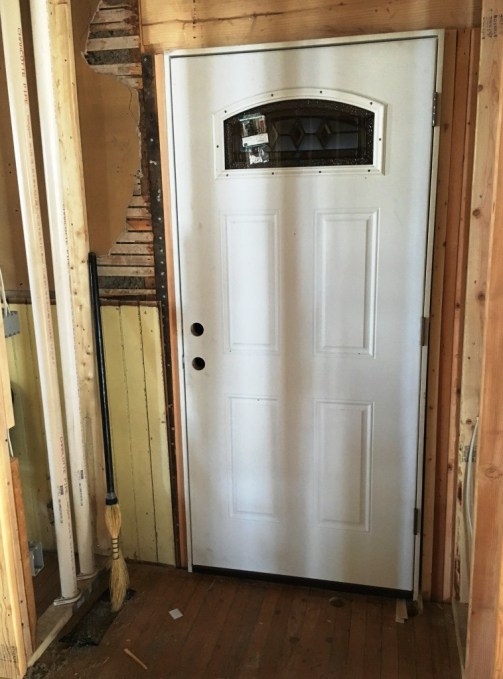
The floor plan for the main floor required Tyler to close off the exterior side entry which was unnecessary in our master bedroom and build a new doorway. The new doorway in the north wall of the church in an area Tyler called the mudroom would someday lead to the garage.
Back entry in imagination.
In February, this door was just a little spray paint and imagination but in April, Tyler installed and one of his skilled laborers installed the actual door, a modern piece with a little leaded glass detail. At this point, it still lead to nowhere, but now the drywallers could work around it.
Our story so far: As reality has caught up with this blog about converting a 126-year-old Methodist church into our home, I’ve run across a few odds and ends that occurred after I wrote about the subject initially. That’s how it goes with a real-time memoir. Sometimes stuff happens after publication. So this week, I’m sharing a few little stories that will ultimately be integrated into the relevant location in the memoir. Think of this as the time in the novel—especially a mystery novel—when you page back to reread a few passages to remind yourself about what’s going on. Here’s a tidbit for Chapter 18.
# # #
We ordered samples of rigid polyurethane foam beams, and we were duly impressed. Lighter and more durable than actual wood beams and more affordable, these faux beams would be installed on the ceiling of the sanctuary-cum-great room. After getting a look at samples of pecan and antique cherry, we decided to go with antique cherry, and Tyler’s fingers flew across his keyboard getting them ordered.
This ain’t no ordinary delivery, nosiree, this is freight.
About ten days later, a semi-truck slowly turned into the street in front of the church. Delivery men (and they were invariably male) frequently looked confused when they compared the address on their clipboards to the building to which they were about to deliver a bath tub, a hearth stone or a bunch of faux beams. When he’d confirmed he was indeed at the right place, he opened the back of the truck to reveal a pile of very long boxes, all with reinforced corners. These foam beams were packaged like crystal wine glasses; the packaging was heavier than the beams themselves. A little team work got the beams of assorted lengths inside the sanctuary, and now we would sidestep them for several weeks until after all the drywall was installed.
Our story so far: As reality has caught up with this blog about converting a 126-year-old Methodist church into our home, I’ve run across a few odds and ends that occurred after I wrote about the subject initially. That’s how it goes with a real-time memoir. Sometimes stuff happens after publication. So this week, I’m sharing a few little stories that will ultimately be integrated into the relevant location in the memoir. Think of this as the time in the novel—especially a mystery novel—when you page back to reread a few passages to remind yourself about what’s going on. Here’s a tidbit for Chapter 18.
# # #
Tyler was a man with a mission to build his home solidly, and as with many efforts in his life, that meant cooking for eight when only two people were eating dinner.
Our doors would, of course, be solid wood, not hollow core. The church came with a number solid wood doors, so this wasn’t difficult to achieve.
As for drywall, only 5/8-inch would do. In his opinion, standard half-inch drywall did not hang flat or stand up to wear and tear.
Insulation, for all its cotton candy fluff, was another way we built solidly. Besides the attic eaves I insulated and the blow-in insulation Reroofer sprayed in the roof, I spent days rolling the pink stuff between wall studs to keep the cold out, protect pipes and provide a sound barrier between us and the outside world. I imagined us living in a muffled pink cloud bank.
Tyler even gave thought to the connective elements of the church.
Glue, for example, is a pansy in terms of connectivity. If one’s house is glued together, the Big Bad Wolf could blow it down even the morning after a bender that involved copious amounts of cigarettes and whiskey. Nails, well now you’re talking power in terms of connecting solid surfaces. But if you really want two surfaces to stay together, you use screws.
Don’t screw around with one of these.
But the big daddy of connective devices is the TimberLok. A TimberLok is a coarse-threaded screw, usually used on larger timbers (as the name implies). In most cases, these expensive babies are not sold by the case; one buys them in a box of twenty at a time. These are not screws to leave in one’s pockets as one’s pants go through the wash. Tyler used TimberLoks in the kitchen header, in the columns holding up the balcony and in whatever warped pieces of lumber he encountered to straighten them out. If a tornado hit the church, we might lose the roof to Kansas but the two-foot thick foundation and the balcony would remain attached to the terra firma.
And then there was the blocking.
At the end of framing, Tyler spent long, boring days nailing blocking between the wall studs and ceiling joists. Blocking creates the sort of solid structures that resist barroom brawls.
More than once, Tyler returned to Home Depot to buy more lumber. “I can’t believe we used all that wood,” he’d mutter.
Those shorter boards there between the floor joists? That’s blocking.
# # #
Tomorrow: How do you fit a sixteen-foot-long beam into a box for shipping? Read how here.
Our story so far: Among the light fixtures we procured for the old Methodist church we were turning into our home, we recycled the pendant chandeliers that once hung in the sanctuary by repainting them and installing new glass.
# # #
While we were paying homage to the church’s historical features, Tyler decided to relocate the milk glass ceiling lights he found in various locations in the church during demolition to the Hall of History.
The Hall of History had no windows so no natural light.
We were maintaining the only hallway that existed in the church. The fifteen-foot-long hall led from the sanctuary to the back stairway up to the second floor and included a closet and the doorway to what would someday be our bedroom. It had a high ceiling (after demo anyway) and beadboard up to the chair rail. He imagined we could hang pictures of the church throughout history on its expansive walls. Thus, he named it the Hall of History.
Vintage light canopies.
He found three milk glass lights of various shapes during demo and a number of rusty canopies (the Lighting Savant taught me this term; a light canopy is the lamp part used to cover ceiling electrical boxes). Though the orbs didn’t match, Tyler thought it would be a nice tip of the hat to history by put them to work in the Hall of History. Once again, I employed spray paint to combat the rust on the canopies and create a uniform element for the disparate orbs. I chose satin black which would stand out against the white ceiling.
Back to the spray paint zone.
And the screws to secure the orbs in the canopies? The old ones were so rusty I could hardly get them out of the canopies, but thanks be to Home Depot, the store offered a whole array of replacement options. Would it surprise you to learn I chose brass? Indeed, bright brass would be the discrete accent to set off the black and white fixture. Because details mattered.
Our story so far: Who needs duct tape when one has spray paint? I made use of it to rejuvenate a set of crystal chandeliers for use in the old Methodist church we were turning into our dream house.
# # #
I also employed spray paint to bring another set of light fixtures into my rustic transitional design scheme.
The lights we chose to hang in the sanctuary, our new great room, would feel right at home because they had hung there in the past, illuminating church services, baptisms and weddings for a least a decade, maybe a generation or two.
Sanctuary light fixtures before.
The former pastor had purchased the light fixtures when the congregation moved out sixteen months before we bought the church. She told us one of the members had donated them, so they had sentimental value. When she met us, she offered to sell them back to us for a song, to which we readily assented once we saw them. The design was a nice union of traditional and modern with a hint of religiosity but without overt evangelism. The cross on all four sides of the square fixture was a curved geometric design. Both Tyler and I were honored we could recycle these light fixtures and hang them where they were meant to be.
They needed a little work, and I was the right woman for the job.
I used old electrical conduit to hang fixtures in my spray paint zone in the basement.
I disassembled them, sanded the surfaces, spray painted them hammered black (I tried a few parts in hammered bronze and rejected the two-tone look) and then hauled them all to the glass expert—the same one who would be installing our glass shower door at some point—to replace the dingy shades with seeded glass. They sparkled when he was done.
Now an associate of the Lighting Savant was employed to rewire them, and weave the wiring through the chains from which they would hang from the ceiling. These chains had been left empty and dangling from the ceiling when we took over. More than one member of the peanut gallery observed they were heavy enough to pull a car. Well, we were “building solidly” per our mission statement, weren’t we? These light fixtures would never fall down! Two of the chains were shortened considerably as the lights would be hanging over the balcony.
In this picture before we actually purchased the church, you can see the lonely chains hanging pointlessly in the sanctuary.
More than any other light fixtures, these chandeliers excited me. I could hardly wait for the day we would hang them from the beams in the sanctuary.
Great room lights after.
# # #
Tomorrow: Lights for the hall of history as Chapter 22 concludes. Read it here.
Our story so far: We invested in a number of new light fixtures for the old Methodist church we were turning into our home, but we also had big plans for some used ones.
# # #
These only thing these light fixtures were speaking to me was “I’m ugly.”
During demolition, I ran across a quartet of ugly, spider-like lighting fixtures. They were ugly to me because I disliked brass (if you’re a fan of brass fixtures, we’ll just have to agree to disagree; I’d heard brass fixtures were coming back, but that was just one trend I couldn’t endorse). I was so close to getting rid of them, I relegated these fixtures to the donate pile. Tyler stopped me. I didn’t understand why at the time, but he obviously saw something in them I couldn’t see.
Also during those early days of clean-up, I ran across a couple of banker’s boxes full of plastic crystals. I thought they might be Christmas decorations; perhaps they somehow hung on a Christmas tree like icicles. I packed them away with the intention of figuring out how to use them later.
Then, more recently, as we discussed how to run electrical wiring, Tyler and I browsed the lighting displays at a couple of big box stores. We were trying to determine which rooms would have can lighting, where we might put sconces, whether to put light kits on the ceiling fans. The electrician would need to know these nuances when he ran wiring through our ceilings and walls.
While in the lighting department, I was inexplicably drawn to the crystal chandeliers.
This was me being stupid. We didn’t have a ballroom in the church, and I didn’t spend a lot of time in floor-length gowns ordering around the servants. “Chandelier” wasn’t in the rustic transitional design plan.
But. Chandeliers are so lovely! Ethereal even. Evocative of heaven. Fit right into a church!
The very definition of rustic chandelier.
(I can justify anything.)
I began thinking I could maybe use those Christmas icicles I found in some sort of chicken cage or tin can to create a rustic chandelier (you’ve heard that definition of creativity that suggests putting two opposite things together in a new way? A tin can chandelier would be the dictionary picture for that).
I actually found a modern light fixture like this at Menards, so I’m not delusional. It’s a thing.
But before making this Frankenstein light fixture, I tried using my icicles on the brass light fixtures I found and almost gave away. Couldn’t hurt to try, I thought.
Check it out. Brass and plastic, transformed!
Poof! Magic happened! The crystals were made for the light fixtures. Whodathunkit? (You knew this was coming, right?) Beautiful! Two of them would be offer perfect lighting for the night stands in our bedroom.
OK, they were still brass, but I could remedy that.
Ever hear of spray paint? It’s magic, too. A few years back, Tyler and I turned sofa legs into the coolest curtain rod ends with spray paint (read about it here; it’s worth checking out just for the before-and-after shots).
# # #
Tomorrow: Great light fixtures for a great room. Read about them here.
Our story so far: While shopping for light fixtures for the old Methodist church we were turning into our home, I met the owner of a nearby lighting showroom who described himself as a “lighting savant.”
# # #
While I could have chosen the exact same lights for all the bathrooms, I decided instead to customize each to the space. This wasn’t a hotel we were outfitting after all.
The display lights had a polished chrome finish, but the ones I ordered were in brushed nickel to match the faucet.
The first lights that caught my eye in the Lighting Savant’s showroom were the ones I chose for the powder room—the big, clear glass bells were distinctive without calling undo attention to themselves.
This image from Pinterest inspired the master bath lighting choice.
For the master bath, I wanted narrow up-and-down lights in polished chrome to install between the three arched mirrors I planned above each sink and the make-up area. (Well, to be fair, what I really wanted was lighted, mirrored medicine cabinets, but that idea was shelved when I looked up the prices. Still, these were the most expensive light fixtures of all the new ones in which we invested.)
For the upstairs bath.
Upstairs, I planned a full-on farmhouse feel, and this was the bathroom where I planned to paint a pair of old dressers for the vanity. The vanity lights I chose were country-inspired glass in industrial polished chrome. The result had a dash of the nautical.
My new lights would be delivered in two to four weeks. Now I devoted my attention to recycling some of the light fixtures we found in the church. At first glance, some had more potential than others.
# # #
Tomorrow: Chandeliers? Really? Read about it here.