Baby, I’m amazed

Our story so far: During the demolition phase of renovating the 126-year-old Methodist church into our home, Tyler discovered the choir loft, and we decided to open it up to a balcony into the sanctuary, our future great room.

# # #

village people
The Village People

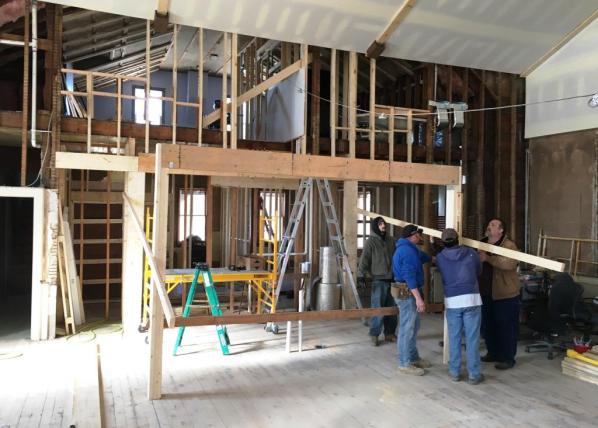
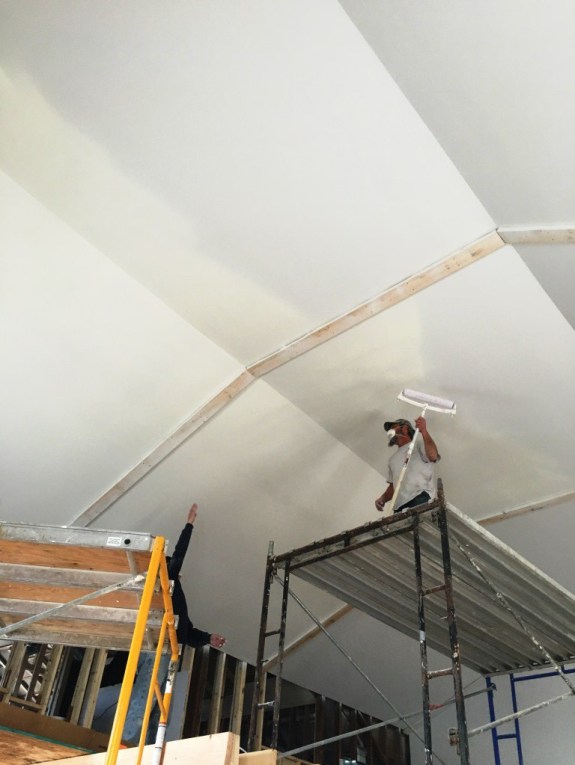
Once the header supporting the second floor was installed, Tyler built the archway upon which the floor joists of the balcony would rest. He enlisted the help of the HVAC guys to raise the arch (witnessing this, all I could think about was an old-fashioned barn raising—it takes a village to build a balcony). Then Tyler—with St. Johnny’s muscle—began nailing great big two-by-tens into place. Pretty soon he had a pergola built above what would someday soon be our kitchen.

pergola balcony
The floor joists of the balcony in place.

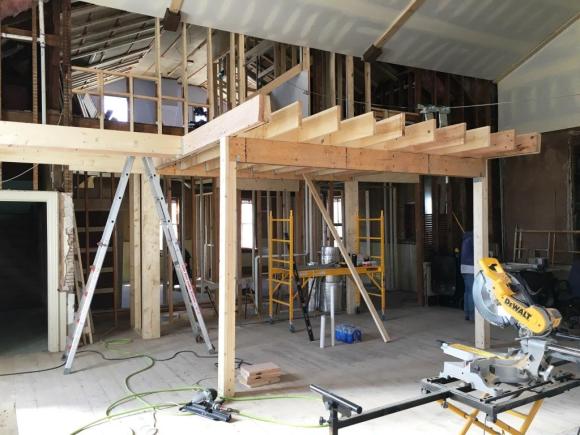
Putting a layer of plywood over the floor joists was easy—after the first piece. I was glad I wasn’t around to watch Tyler straddling floor joists nine feet off the floor to juggle that first piece of plywood and nail it on. He arrived home in one piece that day, so success had been secured.

To wrap up the balcony, Tyler constructed cross joists from the pergola to the north and south walls of the church. These were narrower than the center part of the balcony in order to clear the spiral stairway on the north side and the front window on the south. With the science part complete, a bit of art was necessary to draw the main part of the balcony together with the narrow part; Tyler planned a dramatic scallop and swoop to soften the edges of the balcony.

“Aren’t you impressed that I got that balcony built basically by myself?” Tyler asked me a few days later. He did not have to ask me this question because he knew very well I was impressed with his knowledge of construction and ability to carry out the plan. He asked this question out loud because after all he had built throughout his life, even he was impressed with this particular project.

# # #

Tomorrow: What do we do with all that square footage? Read about it here.

Every long journey begins with a single step (or two)

Our story so far: Things were looking up in the old Methodist church we were turning into our home.

# # #

The grand plan to open up the choir loft required Tyler to construct a balcony for the loft to open up to.

This project began with two steps. To clear the edge of the sanctuary ceiling, we needed two steps down from the second story onto the balcony. This was a big math problem in order to get the step and run measurements correct and beginning in the right place.

After measuring twice (or thrice), he cut once—a hole in the floor. Then he constructed the steps themselves. For the most part, he worked from underneath the two steps, standing on a ladder.

steps to balcony
Ta-da! Two steps.
steps from bottom
The steps are just as impressive from the underside, where one can see all the support structure. At some point, all of this will be hidden away in our bedroom closet.

Now he was ready to build the balcony itself.

# # #

Tomorrow: It takes a village. Read about it here.

A blank canvas upon which to paint dreams

Our story so far: The 20-foot ceiling in the sanctuary—our future great room—was the whole reason we were interested in the old Methodist church so we wanted it to look not just good but grand. 

# # #

ceiling paint job
The drywallers at work, painting.

As long as the scaffolding was in place (and before we built the balcony), Tyler enlisted the drywallers to paint the sanctuary ceiling. As with the drywall, they were nothing if not efficient. They used a sprayer and an enormous roller to do the work. When I walked into the sanctuary to check their progress, it was like walking into fog; the process created an astonishing amount of airborne particulates. Hours later, a fine white dust covered everything in the room.

What color white? This was another detail that mattered. I didn’t want neon white—this was no hospital—so I chose Behr’s Sleek White in eggshell. It was that or Polar Bear, which had a grayish cast. I hoped I chose well.

How much paint is required to paint a church ceiling? Now we knew. We purchased ten gallons of primer and ten gallons of white paint. I couldn’t even lift the buckets! Then, two days later, I picked up two more gallons of paint so the drywallers could finish the job. Twenty-two gallons. That’s a lot of paint.

20 gallons of paint
It’s a workout pushing 20 gallons of paint through a Big Box store.

# # #

Tomorrow: Building a balcony begins with two steps. Read about it here.

Let’s take it from the top

Our story so far: My husband Tyler and I purchased a 126-year-old Methodist church to turn into our home. Three months in, we had completed demolition and were deep into the framing and mechanicals phase of the project.

# # #

Chapter 21

Our Number One design rule was “details matter,” and this was most important starting at the top: The ceilings. The high ceiling in the sanctuary—our future great room—was the whole reason we were interested in a church so we wanted it to look not just good but grand. This is where the finishing work began.

As soon as they had completed demo on the sanctuary ceiling, the drywallers got to work installing the product from which they derived their name: Drywall.

Drywall, for the uninitiated, is a panel made of gypsum plaster pressed between thick sheets of paper. In modern homes, drywall is rarely seen but it literally surrounds us, concealed with paint or wallpaper or paneling inside our walls and ceilings. In the 1950s, it began replacing the traditional lath and plaster as a speedier alternative. We’d removed a good deal of plaster lath from the church to expose areas where we required ducts, pipes and wiring, but on the whole we left it intact where we could because it was strong and secure. But this wasn’t the Sistine Chapel, and we weren’t creating frescos in the plaster. Our sanctuary ceiling required new drywall to replace the fiberboard tiles that were there when we bought the church.

before drywall
The sanctuary ceiling, post demo. You can see the fiberboard tiles on two-thirds of it. We just covered them up with drywall.

Drywall comes in 4-by-8-foot sheets, and the drywallers chose to get it into the church with a boom truck through the upstairs windows. One might think an eighth-inch doesn’t make any difference in most matters, but not Tyler. He chose 5/8-inch drywall for the sanctuary ceiling because it was stiffer and laid flatter. It was also heavier. At one point, Tyler’s hired man St. Johnny and I moved a few pieces out of the way, and it was like, well, like hitting a brick wall.

But the unwieldiness of these large sheets of drywall didn’t deter the drywall team, even as they navigated scaffolding fifteen feet high and higher. Mudding the seams came next, and in a matter of a few days, they had performed their magic.

drywall
The great room ceiling, post drywall and mudding.

# # #

Tomorrow: How many gallons does it take to paint a church ceiling? Read about it here.

Like Chinese water torture

Our story so far: With four bathrooms planned for the old church we were converting into our home, we juggled a lot of details in the mechanicals phase of our project.

# # #

One afternoon when I arrived at the church after a day filled with exciting errands like picking up rough-in valves for Glimfeather the plumber and more paint for the drywallers who were making like Michelangelo and painting the cathedral ceiling, Tyler put me to work handing him tools for the construction of a form to contain the floor-leveling compound in which the upstairs shower stall would nestle.

Tyler built sides for the form; the bottom was simply the century-old pine flooring. Leveling compound is similar to concrete, only soupier. After adding water to the dusty compound, Tyler poured the goop into the form.

Immediately, we could hear the dripping.

“Is it leaking?” Tyler said, then more urgently when it was clear it was indeed leaking, “Where is it leaking?”

I ran down the steps and looked in horror at the rainfall of gray, pasty soup dripping through the floor, through the form, through the shower drain hole.

“Everywhere!”

One of the HVAC guys, who had been working in the basement, appeared out of nowhere to rescue a big roll of aluminum foil bubble wrap covered in pasty drips of leveling compound. “What is that?”

“Leveling compound,” I answered.

“Well, it’s leveling all the way to the basement.”

I shoved a tray and a bucket in place to catch drops.

“Get back up here!” Tyler bellowed.

He’d filled in a couple of the holes but we’d lost so much compound through the cracks, we needed more to fill the form. Tyler began mixing again. “Hand me bottles of water.”

Remember, we didn’t have running water in the church yet. The first batch of soup was made with a jug of water collected that morning at the rental house.

Tyler mixed up another batch of soup and dumped it in the form. “Is it still dripping?”

I ran downstairs again to look even though we both knew it was because we could hear it.

“Yup.”

But the waterfall had slowed to a trickle.

When Tyler came downstairs, I asked, “Did you know that was going to happen?”

“Well, they’re old floors. There’s bound to be a few holes.”

“It was pretty holey.”

“Well, that’s right. We live in a church. It’s a holy floor.”

# # #

Tomorrow: Things are looking up as Chapter 21 begins. Read it here.

Double dip

Our story so far: While juggling other projects, we worked on the bathrooms in the 126-year-old Methodist church we were turning into our home.

# # #

Meanwhile, Tyler ordered the fiberglass shower surround and corner tub for the upstairs bathroom from two different big-box retailers (each cost roughly $1,000, which goes to show how much less were cookie-cutter options than custom ones). We needed to have these before we constructed the walls because they both were too large to get through the doorway. Fortunately when they arrived by delivery truck, the odd assortment of contractors on site at the time helped get them upstairs.

We (by “we,” I mean mostly Tyler) built the walls for the bathroom on the second floor. Like our other bathrooms, this one featured a pocket door.

Besides the pockets provided in the form of a kit from Home Depot, these pocket doors required doors. For the second-floor bathroom and the powder room on the main floor, we were using the doors that had been on the basement bathroom and utility room. They were beautiful solid wood covered by layers of paint (and other gunk).

Rest Room Signed door
This door, formerly on the basement bathroom, would be reused as the powder room pocket door on the main floor.

Tyler tried using a non-caustic stripper, but he got nowhere with it.

So we endeavored to have them dipped. Dip stripping is when wood is placed in a large vat of solvent to help remove paint and varnish before refinishing. A nearby antiques dealer hooked us up with her dipper.

The doors were free because they came with the church. But dipping them cost $200 each.

Oof. You know that sound Skipper makes when Gilligan accidentally hits him in the gut? Yeah, that.

dipped doors
Doors, post dip.

But in any case, they turned out beautifully. All they would require is a bit of light stain and some polyurethane. And a couple of cool plates to cover the door knob holes.

# # #

Monday: Speaking of holes … Read about it here.

We aim to please; you aim, too, please

Our story so far: We were preoccupied by bathrooms as the plumber worked and we renovated the 126-year-old Methodist church we were turning into our home.

# # #

But nothing could be as bad as the contractors’ bucket.

Shortly after Glimfeather the plumber began work, the only piece of operational plumbing in the church was decommissioned in order to move around pipes or drains or vents or something.

But like other bodily functions, pee happens. The parade of contractors through the church were exclusively men so Tyler could get away with establishing a five-gallon bucket in the back entryway as a temporary urinal. Who needs a porta-potty when ya got a bucket?

I, of course, opted out. Way out. I wouldn’t even volunteer to empty the thing. But I also had to plan my coffee consumption and work breaks in order to make a trip back to the rental house to relieve myself when necessary.

For a month, the guys carried on with nary a complaint (guys are like that).

As Glimfeather wrapped up his work, the original toilet in all its porcelain glory and running water was reinstalled in the basement bathroom which, I should mention, still lacked an operational vanity sink and a door, but still—a toilet! Applause—with unwashed hands—erupted in the crowd.

# # #

Tomorrow: We take a dip. Read it here.

How not to finish a bathroom

Our story so far: Tyler and I struggled to acquire a custom shower in budget, but we agreed to keep it simple with most of bathroom fixtures in the old church we were turning into our home by selecting polished chrome.

# # #

The bathroom fixtures in the rental house were brass, and apologies to brass fans, they were ugly, not retro, not trendy. The whole room was a lesson in how not to finish a bathroom.

We had been living in the little rental house for four months. It was cozy. And infinitely cleaner than the church-in-renovation (despite my poor housekeeping). But as we obsessed about the finishing details in the church, I couldn’t help but notice all the little mistakes in our rental.

Case in point: The bathroom.

rental bathroom vanity
This vanity is better suited to a powder room than to the only bathroom in a house.
rental bathroom over the tank
Built-in-shelving would prevent us from having to store towels on the, ick, toilet tank.

The rental house had only one closet—in the bedroom. Not having a linen closet makes one appreciate this simple luxury. Especially when the bathroom features only a single-sink vanity. It was impossible to fit all the towels, first aid supplies, toiletries, cleaning products and extra toilet paper we used in the vicinity of the bathroom. I found a beat-up over-the-tank storage system in the basement, so someone had tried to improve the bathroom storage but someone else gave up on it. Someone should have built permanent shelves over the toilet, but we were not someone—we were going to focus our energy on projects in the church.

Only one outlet? Just our electric toothbrushes used this up. And I still had a Waterpik, curling iron, blow dryer. Often, we plugged in bathroom appliances in the kitchen, which was neither handy or appetizing. We were planning to have so many outlets in our bathrooms, we’d never run out!

rental bathroom towel ring
Hmm. How odd.

Speaking of one, there was one lonely towel ring in the bathroom. Situated strangely at eye-level next to the shower.

Not only where the brass fixtures in our rental bath better suited to King Midas, but the faucet handle was loose, and the replacement shower head didn’t match. Ugh.

rental bathroom door trim
You couldn’t plan ahead far enough to accommodate the extra half inch required for the same trim on both sides?

The trim was poorly planned. This kind of lack of attention to detail drove me mad. Builders should never have to cut corners on door trim or skip portions of baseboard for no apparent reason. And why were the screws around the tub surround exposed? Even pre-formed shower walls could use proper trim. And this. The tiny vanity was level (I guess), but only because of a shim that showed under the kick plate. So sloppy.

As we planned our own bathrooms in the church, we hoped to avoid similarly poor workmanship. Because instead of tolerating it for a few months, we’d be living with it long-term. And if it reflected poor workmanship, we’d only have ourselves to blame.

# # #

Tomorrow: But nothing could be as bad as the contractors’ bucket. Read about it here.

It’s the fixtures and fittings that finish you off

Our story so far: After much backing and forthing, we found a reasonably affordable way to construct an extra-large custom shower in our master bathroom in our church conversion, but we couldn’t put away our shopping list yet.

# # #

Ah, the fixtures.

I wanted a rainfall shower head. I naively believed that’s how they were sold: Shower head, rainfall; Quantity: One.

Um, no.

One needs valves. They’re the parts you can’t see, but if you don’t have them, you don’t have things like water pressure or temperature control. Then you need something called “valve trim.” This the knob that turns on the water.

Then you need the shower head. But sometimes you might also need a shower head arm and a shower head flange.

Naturally, each of these parts has its own price.

Oh, and you’re not done yet. Now you choose a style. And don’t forget the finish: brass, copper, bronze, chrome—oh, not so fast—would you like that in polished, brushed, matte?

bathtub faucet
Mm, pretty.

Tyler chose a distinctive Kohler bathtub faucet for the upstairs bath but we went with the “contractor special” for the shower up there. For the master bathroom, we also considered Kohler, a manufacturer based in what was now our home state of Wisconsin, but in the end we went with polished chrome Moen fixtures. I was reading everywhere that brass was new and trendy, but I hated brass; polished chrome would look clean, be durable and would make it easy to find accessories and other fixtures.

# # #

Tomorrow: Why brass is crass. And other judgy opinions from the peanut gallery. Read it here.