Merchant Wednesday: Beams that’ll make you beam

As we have reinvested in home furnishings and decorations to style our Church Sweet Home, we’ve run across a number of amazing artists and vendors. Sometimes the vendor is a big-box-type store but more often it’s an online retailer or a local vendor. On some Wednesdays here on Church Sweet Home, I will share our latest find and reveal who provided it to help other interested home designers.

# # #

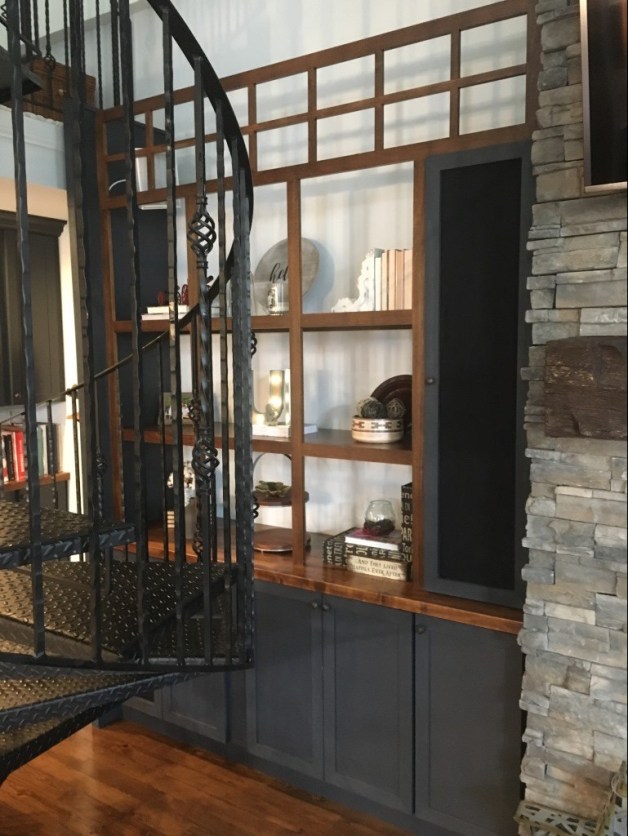
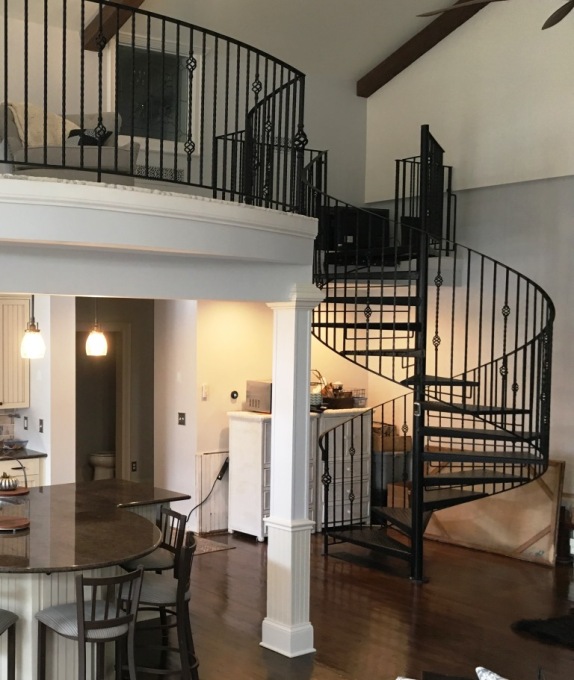
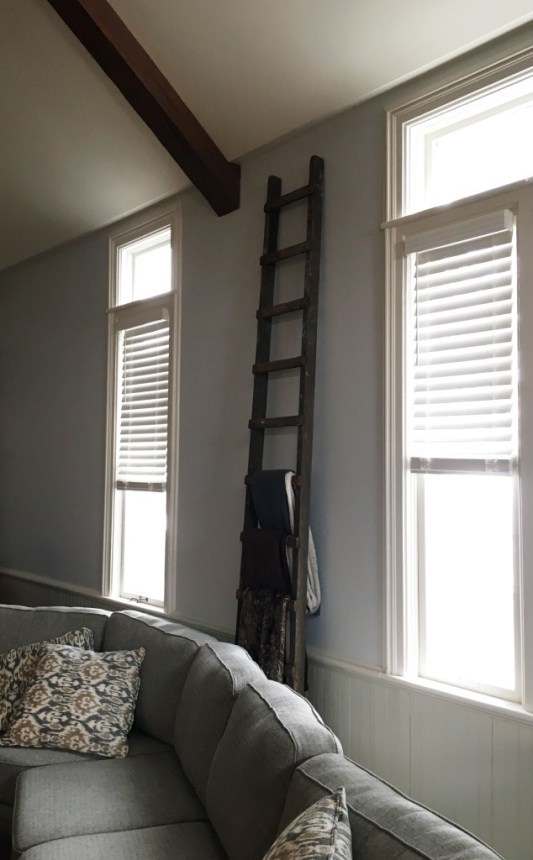
One of the distinctive features of our great room is our ceiling beams. There is the fireplace, and the spiral stairway, and that fab reused kitchen, too, but today we’re talking beams.

Faux wood beams.

The very first minute I stood in the old church sanctuary when we were checking it out with our real estate agent, I knew I wanted to put wood beams on that big beautiful ceiling. And Tyler figured out how to do it without hoisting two-ton hunks of timber up there.

Tyler found rigid polyurethane foam beams online—lighter and more durable than actual wood beams and more affordable, they were advertised as being “virtually indistinguishable from real wood.” The array of options was dazzling.

L beam or U beam?

Rough sawn or hand hewn (or any of eight other textures)?

How wide? How high? How long? Do you need endcaps?

What color? We knew we wanted “brown” but we could choose from among eleven shades of brown. We finally settled on antique cherry.

They arrived some weeks later by semi-truck, not your typical delivery but packed perfectly to protect our precious cargo.

beams shipped
Here are our faux wood beams, waiting in the great room for installation.

Remarkable. They really were virtually indistinguishable from real wood beams. And they were as light as cappuccino foam, which made them easier to install.

This was just the distinction we wanted for the cathedral ceiling of our great room.

Tyler found our beams at the Architectural Depot, “the do-it-yourself superstore.” Given their “superstore” tagline, they sell a lot more than faux wood beams. If you’re in the market for ceiling medallions, moulding, PVC millwork, shutters, columns, corbels & brackets, ventilation, doors and windows, siding and components, weathervanes or yard items, they offer things, too.

beams close up
Here’s a close-up view from the balcony of our hand-hewn faux wood.
beams overall
Antique cherry is just the right contrast against our white ceiling.

We also used the faux wood beams in a smaller area: The entryway. We used them to add interest to an otherwise standard peaked ceiling.

518 Booth Entryway Before
When we bought the church, the entryway ceiling was flat, covered with undistinctive ceiling tiles.
beams-in-entryway.jpg
Here’s how the ceiling looked after we installed the beams (but before the light fixture). They coordinate perfectly with our castle doors.
beams chillin
This picture of us chilling in our great room was taken by our Nest security system. This bottom-up shot really shows how grand the ceiling looks.

You can check out all that the Architectural Depot has to offer by clicking here. The website is user-friendly and you’ll find all kinds of great tips when you place an order. Also, we were able to order short sample pieces of beam before investing a couple thousand in the final product. I highly recommend doing that if you have a big project (or even a small one).

100% guaranteed

When you’re on a home improvement kick, absolutely everywhere you go offers the potential for inspiration.

Early on, Tyler and I bided our time waiting to close our deal on the church by visiting home improvement shows, home improvement stores, furniture stores, parades of homes, every show on HGTV, friends’ houses … you get the picture. We kept that up throughout construction.

Eventually, we got to the decorating phase, and I spent a lot of time at Pier 1. And as luck would have it, the nearby Pier 1 was next door to a Bath & Body Works store. So easy to stop in for hand soap (and body lotion and lip gloss …). I also spied this display in the back of the store behind the cash register. Where other people saw a brightly lit 100% guarantee, I saw 100% bright idea.

back wall inspiration
Welcome to Bath & Body Works.

The owner told me that in other franchise stores, that space filled by the sign was a big television screen with animated advertising; she just didn’t have the flat screen. I loved the lighting effect and the window pane design, and I thought, “That idea could work on the back wall of the great room.”

Click! I took a picture.

That retail display inspired the custom cabinetry on the right side of our fireplace in the church.

back wall right side
You’re going to have to use your imagination for this side.

Well, we’re not quite done, but I’ve been stringing you along on the back wall of the church for a week now. My “advertising” is still in the works. The flower, mirror and adorable picture of my granddaughter are placeholders for a grouping of a dozen canvas-wrapped vacation and family photos I’m going to display there. Also, we have rope lighting hidden in there, but these photos were taken during the day. You’re just going to have to trust me. It’s going to be epic.

back wall with pantry
This angle shows the pantry (left) and the entire back wall of the great room.

Overall, we don’t have perfect symmetry on the left and right sides of the fireplace, but we wiped that out as soon as we installed the spiral staircase. We have coordination. Matchy-matchy is so yesterday’s Sears showroom anyway.

Let’s remind ourselves where we began. Oh, dear.

sanctuary before
Here’s what the back wall of the church looked like when we purchased the building.
back wall straight on
And here’s how it looks today.

Sometimes the most productive thing you can do is relax

Before I move along to the east side of the fireplace, let’s make a quick stop in front of the fireplace.

(Feel like you’re joining the conversation mid-stream? I’m sharing how the back wall of my great room in the converted 127-year-old church turned out. Check out this post to read about the pantry and this post to read about the left side of the fireplace.)

I wanted to create a little conversation area in front of the fireplace, but Tyler and I struggled to find the right chairs. They needed to be comfortable and low profile in order to clear the spiral stair on the left side of the hearth. Oh, and the right color—not too gray and not too splashy.

fireplace chair one
This photo makes the chair look beige, but it’s more caramelly than that.

We ended up choosing custom back-tufted caramel-colored leather chairs. And they swivel! Which is perfect for a guest who might want to warm up by the fire and then turn to enjoy the conversation.

We ordered them before Thanksgiving, and they weren’t delivered until February. It pained me to entertain at Christmas without them, but when they finally arrived, they were perfect.

The nailhead detail coordinates with the dark navy storage ottomans we found at another furniture store. Beside stashing our granddaughter’s random toys and books inside between her visits, the ottomans perform as footrests and drink rests, as needed.

fireplace chairs
You can see a peek of the right side of the fireplace cabinetry.

The whole setting is arranged on the faux bear rug Tyler found online (no bears were killed in the making of this rug—read about it here).

(I’ll share another picture of the right side of the fireplace later this week.)

To a great mind, nothing is little

From the beginning, Tyler imagined bookshelves on either side of our floor-to-ceiling fireplace in our Church Sweet Home. I imagined he was thinking of something along the lines of a study in a Sherlock Holmes novel.

The shelves we ended up with are more open and airy than an English detective’s. As with the room in general, they are not symetrical on each side of the fireplace.

great room after floor refinishing
Here’s a reminder of how the back wall of the great room looked after we finished the floor.
Today, I’m showing off the shelves on the left side. This spot is obscured to some extent by our spiral stairway.

shelves from right
Shelving, looking from the fireplace.
The cabinets along the bottom hide all sorts of stereo equipment. There’s a front-throwing subwoofer (an audiophile understands this terminology) in a screen-covered cabinet on the bottom left there, and a huge standing speaker inside that screen-covered cabinet flanking the fireplace.

shelves from left
Shelves from pantry side.
I’ve decorated the shelves in Joanna Gaines style, including some Methodist hymnals (bottom left), the wooden bowl created by my dad (middle right) and a couple of functional miniature cannons that have been in Tyler’s family for some years.

Finishing the back wall is no longer a mystery! I’ll share the right side of the fireplace later this week.

# # #

Today’s headline is a quote put into Sherlock Holmes’ mouth by Sir Author Conan Doyle in A Study in Scarlet.

Pantry plotting

If you were to do a deep dive into the computer files on my computer desktop for all things related to our church conversion project, you’d find among the first documents I created one called “House wish list.” It’s dated shortly after the congregation accepted our purchase offer on the church but more than a month before we actually took ownership. At this point in the project, we had walked through the church three times but we were just dreaming and planning because we couldn’t do any work yet.

On the two-page list are items like “method for displaying china,” “walk-in closet” and “ginormous *expletive* TV screen” (excuse my French). Check, check and check. We worked all those things into the design for our Church Sweet Home.

Also on the list for the kitchen? “Pantry area with lots of storage.”

In one of the early floor plans, our pantry was a walk-in closet sharing space from what is now our walk-in-clothes closet, but we had to scrap that idea when we found the amazingly priced display kitchen. We designed our kitchen around the cabinets that came with the display kitchen, and that meant putting our refrigerator into the pantry space. The display kitchen also failed to leave room for a microwave.

We plowed ahead knowing we would figure something out.

pantry area before demo
This picture was taken shortly after we took ownership of the church before we demoed much of anything. The closet on the left became our back door to the garage. The area on the right is the spot that would someday become our pantry. In the area on the right, you can see the step-up of the altar area and the end of the communion rail, both of which were torn out during demo.

At some point, I saw a picture of a bank of shallow floor-to-ceiling cabinets in a kitchen, and I figured we could turn the northwest corner of the great room into our pantry using some version of this concept. When we moved into the church, a pair of beat-up wicker cabinets served as the pantry.

Pantry area before
A pair of wicker cabinets under the spiral stairway comprised our pantry when we moved into the church last fall.

After Christmas, Tyler took up the project of building cabinets for the pantry and the back wall of the great room. Note: That’s about 25 linear feet of cabinets which is to say a lot of cabinetry (“go big or go home,” remember?). After much shopping, he determined he could buy ready-to-assemble cabinets for about $10,000 not including counter tops.

Well, we didn’t have $10,000 to built cabinets for canned food and stereo equipment. The Tequila Budget was so far back in our rear view mirror we couldn’t see it anymore but that doesn’t mean we didn’t think about the bottom line.

After consulting with You-Can-Call-Me Al, Tyler determined he could build and paint custom cabinets for significantly less than $10,000. In the end, the pantry and the back wall of cabinets and shelving cost about $8,300 in labor and materials (including the counter tops, cabinet knobs and finishing trim). We got exactly what we were envisioning, so going the totally custom route was the right choice for us.

pantry area after
Our pantry, after.

My pantry now includes space for a mop and broom (in the cupboard on the end there), space for the microwave and all my cookbooks, and a whole lot of larder space for canned goods, paper towels, potato chips and all kinds of chocolate (must have space for chocolate).

Tyler and You-Can-Call-Me Al built these cabinets from scatch, and You-Can-Call-Me-Al figured out how to accommodate our semi-straight walls and undulating floors (it’s a 127-year-old church, remember). We chose the same military blue cabinet colors as we have in the beverage bar in the opposite corner of the great room. The counter top is butcher block stained the same color as our front entryway steps. You-Can-Call-Me-Al, who we initially hired to tile our shower, tiled the back splash in the same manner as the rest of the kitchen.

telephone
It’s a party line. One-ringy-dingy, two-ringy-dingy…

The corner at the end of the pantry remotely resembles a phone booth. It seemed to be the perfect place to mount an antique telephone.

# # #

I’ll share pictures of the back wall of cabinets flanking the fireplace in the great room in Church Sweet Home posts next week. Stay tuned.


Merchant Wednesday: Ginger Blossom

As we have reinvested in home furnishings and decorations to style our Church Sweet Home, we’ve run across a number of amazing artists and vendors. Sometimes the vendor is a big-box-type store but more often it’s an online retailer or a local vendor. On some Wednesdays here on Church Sweet Home, I will share our latest find and reveal who provided it to help other interested home designers.

# # #

We drove by the inconspicuous property at least a dozen times before we stopped, lured in with a sandwich board sign that promoted a deal on wool sweaters.

Our curiosity was amply rewarded when we discovered all the interesting imported goods at Ginger Blossom, a vendor for ethnic and traditional crafts, rugs, furniture, sweaters, antiques and more from all over the world, displayed and sold at a farm just outside of Richmond, Illinois.

We liked the furniture offerings so much, we invested in three pieces.

china hutch

Our china cabinet is a huge piece (it came in two parts), and it displays all my china.

dining room table

The dining room table is made of teak. My father teased that it could use a good sanding, but we love the rustic look of it.

ginger blossom dresser

And the dresser in our master bedroom is a charismatic piece that adds color and interest to the room while holding sweaters inside and our TV on top.

Most of Ginger Blossom’s goods were imported from Asia, so the farm has a wide selection of stone Buddas and Hindi gods, but it also offered unique jewelry, colorful dishware, one-of-a-kind furniture, hand-woven rugs and cotton bedding. According to the website, “The core inventory features primarily home furnishings and accent pieces, and ethnic and tribal collectibles, including rustic pine furniture, furniture made from architectural salvage, and antique Swati and Tibetan trunks.” There is an entire room of fantastic rugs.

For Christmas, I gave several members of my family hand-knitted gloves I found at Ginger Blossom,  and in the summertime, it’s a great place to find pots and garden decor, too.

Ginger Blossom is absolutely worth the stop if you’re visiting the area. They’re open daily and you can find it at 3016 Route 173, Richmond, Illinois.

By the way, our china cabinet comes with a story.

My son-in-law, who has lived in the area all his life and has heard all the stories, jokes that our china cabinet is “the murder hutch.”

A couple was murdered by a motorcycle gang in 1993 at the property that is now Ginger Blossom, where we found our beautiful cabinet. The couple’s son was wrongly convicted of the crime and sentenced to die by lethal injection until a law professor and Northwestern University School of Law’s Center on Wrongful Convictions took up the case. He was released and wrote a book about it, which is for sale in the gift shop of Ginger Blossom. Look for In Spite of the System: A Personal Story of Wrongful Conviction & Exoneration by Gary Gauger.

Repurposing a paint-splotched ladder

To continue the theme of mixing old and new around Church Sweet Home, here’s a look at the afghan storage device in my living room: An antique wooden ladder.

ladder in full

We found this beauty leaning against a roof outside an old antique shop in a village not too far from our house. “Shop” would be an understatement—it was more of an antique plantation with building after building filled with dusty treasures and junk. Need an old brass candlestick or bronze light fixture? This guy has hundreds of them, plus every other thing he’s salvaged in his eight decades on this planet.

In any case, he also had this 14-foot tall ladder. A quick spin around Pinterest will reveal how to use antique step ladders in creative ways, but few other homeowners would want a ladder so big. We, of course, have 20-foot ceilings in the church.

Tyler and I wire-brush scrubbed it clean of bird poop while leaving behind the paint splotches on the weathered wood. We hauled it into the church and discovered it was just a little too tall to lean against the side wall where we intended it, so we hauled back down to the basement where Tyler sawed a rung off the bottom. Perfection!

I’m thinking I might still hang some pictures inside the upper rungs, but for now, it’s just right for hanging extra afghans.

ladder closeup

All’s well that ends well … with a bath

It took months, but we finally finished the tub surround.

There’s one bathtub in the chome, and it’s in the upstairs guest bathroom. The tub itself, a big soaker, was purchased early on. It was so big, we needed it in the room before we built the walls around it.

We finished the room around the tub including the shower, the vanity and the toilet. But the tub was just a basin for dust even four months after we moved in. Why? We went round and round with the tub faucet.

First we bought a beautiful waterfall faucet when we purchased all our other bathroom fixtures. When the plumber tried to install it, he pointed out it was a faucet for a bathroom sink; it would take hours to fill our tub with it. So the plumber ordered a tub faucet for us. When he inspected the parts, he realized it was missing the correct fittings. After much backing and forthing, he determined he could not even get the correct fittings. So Tyler looked in vain for a waterfall faucet online. We finally settled on a faucet with a shower sprayer. From Amazon. After nine months of screwing around, it was delivered the next day.

Once Glimfeather, our long-suffering plumber, got the faucet installed, we were ready to enclose the sides of the tub. You-Can-Call-Me-Al, our talented carpenter, built the sides with the same reclaimed wood we used for one wall in the guest powder room and for our headboard in the master bedroom.

Finally, we invited the stone guys to measure for the tub surround. I found a simple white quartz in the remnants pile out back of their operation, and the stone guys installed it over two days.

tub in full
The bath tub in all its glory.

Tyler, who is the bigger fan of baths between the two of us, drew a bath the first chance he could. I retreated downstairs to look for leaks. None were found so we could both relax, he among bubbles and me on the dry main floor.

bath faucet
Our faucet, finally.

The faucet is not what we first chose, but it has functional beauty. I can wash my hair in the tub if I choose, and someday it will be handy to give a squirmy grandchild a bath.

tub surround
A close-up look at our reclaimed wood.

Upon further reflection, I think the distinctive reclaimed wood we’ve been using in the chome was reclaimed to begin with. We found it in the basement during demolition; the tin ceiling was nailed to it. Because of all the various paint colors, it must have served some other purposes before it was pressed into service in the ceiling. So it’s been reclaimed twice. All we did to it was add a couple coats of clear polyurethane.

And finally, the guest bathroom is complete.


Works of wood, courtesy of Dad

“I could paint it!”

That was my refrain the past 18 months as Tyler and I have remodeled the old Methodist church into our home. Trim? Paint it. Cupboards? Painted. Antique finds? Sand it, and cover it with paint. Raw wood, weathered wood, finished wood, painted wood—I always think I can paint it.

But Tyler is not as much a fan of painted wood as I am. Sometimes he likes the warmth of stained wood. My father, a talented woodworker, thinks similarly, and he came through with two beautiful items that show off the wood—no paint.

I’m sharing these two projects today in honor of Dad’s birthday tomorrow. In his retirement, he has created a vast array of beautiful wood pieces, including many pieces of furniture, uncounted tiny kitchen table sets for toddlers, cribbage boards, turning puzzle boards and other cool and unique items. He’s quite creative and rather humble. But I’m calling attention to him and his work because he deserves it, especially on his birthday. (Happy Birthday, Dad!)

end table from side
That a raw edge with some of the bark still attached.

The first piece was an end table Dad made for me for my birthday. You know how some people collect cool postage stamps or whale figurines? My dad appreciates wood. So when a tree fell down in his yard, he didn’t see garbage—he saw raw material.

trunk end table
Look at all those rings of growth! That was an old tree, just like the church.

The top of this end table is a slice of wood from that fallen tree, raw edges an all, and the stand was carefully created by Dad in his woodshop with various tools that make pieces of lumber into beautiful artifacts. The table now stands at attention between two loungers on my balcony, the perfect natural touch among my refined chairs.

dads bowl in full

Speaking of beautiful artifacts, Dad sent me this bowl he made “just because.” Well, it wasn’t only because he was thinking of me randomly. He made his first turned bowl for my mother and the second for my sister as a birthday gift so he didn’t want me to feel left out.

dads bowl

This bowl is made of 200 pieces of walnut and maple, carefully assembled, glued and planed (I think planed is the verb, maybe it’s turned) into this one-of-a-kind piece made just for me. (Thanks, Dad!)

I’ve now set this bowl in a place of honor in the new shelving at the back of our great room. That project is another story. I’ll share pictures of those shelves on another day.

The comfort of an old wooden pew

When we purchased the old Methodist church we intended to turn into our home, absent were many of the furnishings one finds in other churches. The altar had been left on the curb to be scavenged. There was no baptismal font. And the pews were gone.

sanctuary before
If you squint, you can see the indentations left in the carpet where the pews used to stand. This is the sanctuary when we took ownership of the church.

Oh, we found a few banquet chairs in the basement, and the congregants left behind some 1950s Sunday school chairs, but the only thing left in the sanctuary was the communion rail. Late in demolition, we found a few pew parts stashed in the cubby above the back door, though they were nothing we could reassemble into seating of any sort.

But a church isn’t complete without pews, right?

Perhaps ironically. Tyler had been carrying around a former church pew for the better part of his life. Who knew it would find its way back into a church?

Back in the 1970s, Tyler’s dad bought a number of pews when the old St. James Catholic Church in Belvidere, Illinois, was torn down to be rebuilt. Tyler’s family owned a number of shoe stores, and what shoe salesman can’t use more customer seating?

entry-way-after
The front entryway of our former home.

Eventually, the shoe stores closed, and Tyler acquired one of the pews. By the time I came into the picture, the pew had been shortened to about four feet long and was finished in golden oak. It sat just inside the front door of our first home together, and many guests removed or put on their shoes while sitting in it. When we left that home and sold most of our furnishing to live in an RV, the distinctive and meaningful pew was one of the few pieces we kept in storage.

As we designed the layout of Church Sweet Home, we both had in mind to reinstall the old pew in a place of honor and function near the back door. Many other projects were in line before rejuvenating the old pew, but finally after Christmas, Tyler gave the pew some attention because it was falling apart. It needed to be glued back together and the golden oak finish had to go. St. Johnny, Tyler’s hired man, spent many hours sanding the pew, and Tyler chose and nice brown stain.

pew closeup
The pew is a classic Gothic style with many details any woodworker would admire, including Lancet window impressions on the side.

How many people sat in this pew to pray or sing or listen to a sermon or witness a baptism or a funeral? Now it performs a functional purpose again, providing a place to set groceries or seating when I put on my boots. These are not sacred acts, perhaps, but it’s nice to have this piece of history in our home.

pew straight on
The pew in our new back entryway.