West side story

Every success story is a tale of constant adaption, revision and change.

~ Richard Branson, entrepreneur

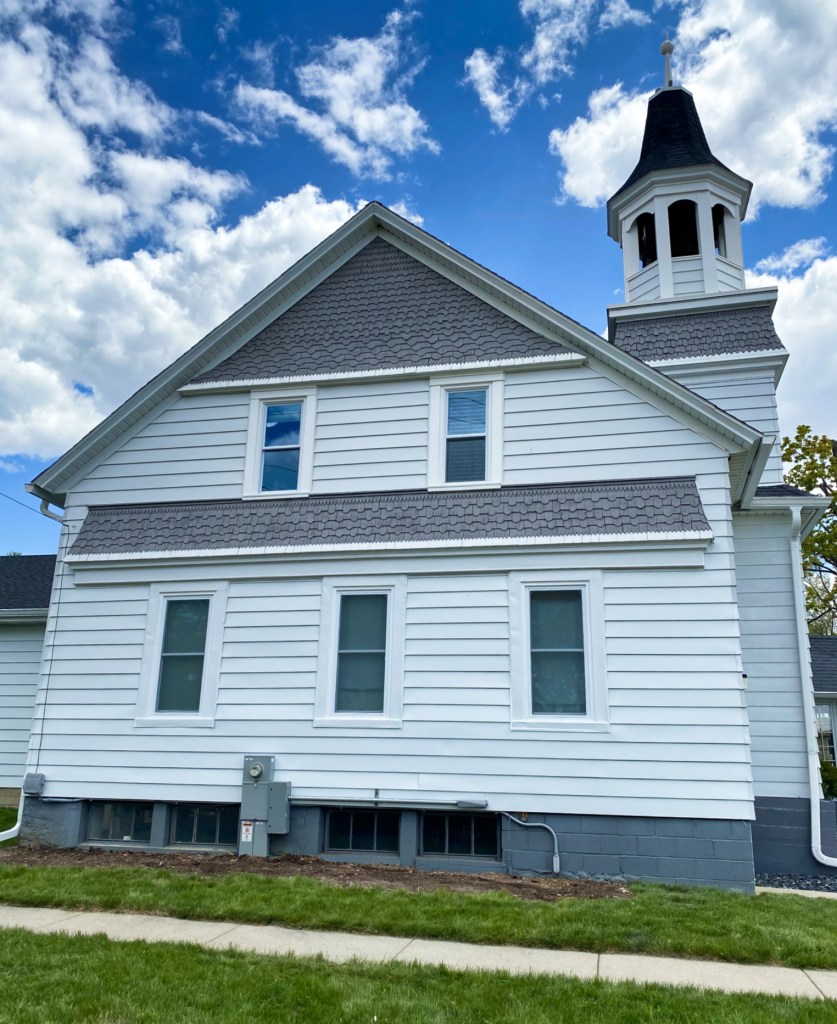
The evolution of the west side of our church conversion project is complete.

Church forefathers have probably stated this very thing over the years. When the building was first built. When it was repainted. When it was sided. Heck (can I say heck on this blog?), even I’ve said it during our renovation of the church into our home.

Here’s how the west side of the church looked when we purchased it in 2017.

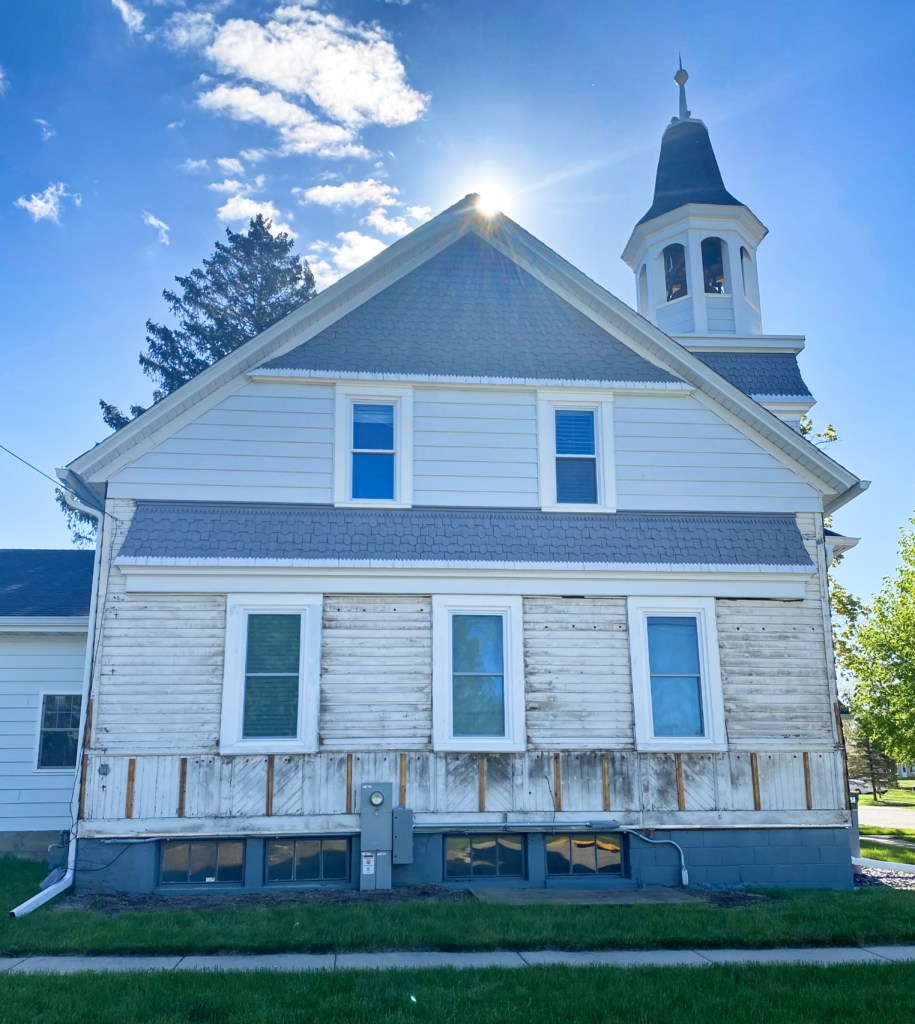
Note the fire escape on the side of the building and the old windows (and, oh my gosh, look how rickety the bell tower looked!). You can see the siding that covered up—something—there in the middle between the two stories of windows.

After hauling away the fire escape, replacing all the windows and removing the siding on the second floor in 2020, we revealed beautiful shakes in the peak and in that “frosting” layer between stories. Our talented carpenter, You-Can-Call-Me-Al, replaced the missing shakes, and we painted all the shakes gray. You can see, though, how the edges on the right and left of the middle layer are incomplete. Also, we had a whole lot of dented siding on the first floor (it got dented during a hail storm during reconstruction of the interior of the church).

Finally, this week, Tyler and You-Can-Call-Me-Al addressed the edges and first floor. In three days, the two of them replaced all the dented siding and fixed the sides of the shake frosting layer.

First, Tyler removed the dented siding, revealing an interesting pattern of original wood siding.

How about vertical siding? And diagonal while we’re at it.

I wonder if the original church fathers were trying to add interest to the exterior in lieu of stained glass windows and other traditional church detailing. We also saw that diagonal siding on the bell tower when we stripped it.

The old edging on the shakes bothered me. It looks perfect now.

While You-Can-Call-Me-Al was monkeying around, he climbed up to the bell tower and rethreaded the bell rope, which got off the track somehow and made it so we couldn’t ring the bell. No more! The bell is in working order again (and You-Can-Call-Me-Al is safely on the ground).

Tyler intends to plant a row of bushes along the west side which will complete the look. For now anyway.

The time comes to finish the basement

For everything there is a season, and a time for every matter under heaven.

~Ecclesiastes 3:1
The basement in all its “before” glory (and grime).

Wack to burk.

When we purchased the old Methodist church to turn into our home, the basement was scary.

Most unfinished basements stoke trepidation in those who visit, but this one had the added horrors of ongoing water problems and asbestos floor tiles. The only things it had going for it were that it had the building’s operational toilet, itself a tribute to the unclean, and the potential for a high ceiling. During demolition, we removed the moldy suspended ceiling and the antique tin ceiling above it, leaving us with at least nine feet of clearance in most areas and lots of sunny windows, impressive for a basement.

The basement bathroom was practically spa-like.

During demolition back in early 2018, we also removed the kitchen cabinets and pass-through and created a new doorway to the bathroom, though we still don’t have an actual door. Meanwhile, the furnace room got an impressive makeover. We had big plans back then for the basement.

The basement served as a staging area during renovation upstairs.

As we renovated the main floor and second story, the basement served us well, providing a place to paint, hammer, assemble and store stuff (mainly tools). As the renovation dragged on, our enthusiasm for tackling the basement waned. When we held an open house for the community to show off our work upstairs, the basement was mostly off limits.

But the Summer of 2021 holds promise for ye olde basement of the Methodist church. We have energy! Enthusiasm! Ideas! By gosh and by golly, we’re gonna finish the basement this summer!

The basement as a clean slate.

Here’s how it looks right now. The kitchen–gone. The paneling–gone. The suspended ceiling is long gone. Plumbing and shiny new duct work has been run throughout. (The photo does not show all the Christmas decorations I have stashed down there, which my husband will soon discover and about which he will probably raise his voice. Dagnabit, Monica! Why is all this stuff down here?! You have 10 minutes to get this stuff out of my way and back in the attic. Only he won’t say “dagnabit” or “stuff.”)

We plan to create a mother-in-law’s apartment down there with its own egress plus a few extra bedrooms for our guests. And we have every intention of doing it on the cheap, incorporating our design principle of “recycle, reuse, repurpose whenever possible.” We already have a massive set of second-hand kitchen cabinets and a lot doors, leftover from the reno upstairs. Plus a toilet! Don’t forget the toilet!

That plumbing and shiny ductwork present the biggest challenge. How do we cover it up without sacrificing headroom? I can’t tell you how many YouTube videos and HGTV shows my husband has unearthed in the past 18 months to help us solve this problem. We could just paint everything on the ceiling black (or white), but that approach doesn’t give us any sound-proofing between floors. Like I mentioned, we have ideas, and you’re certain to hear more about this dilemma in future installments.

Speaking of future installments, if you’re not already a subscriber, by all means, subscribe now! Enter your email address in the right-hand column over there (if you’re reading this on your phone, click on those three lines on the upper left corner, then click on “contact” and scroll to the very bottom–fill in your email there).

A time to keep, and a time to cast away;
a time to rend, and a time to sew.

~Ecclesiastes 3:6b-7a

# # #

Catch up on what we’ve accomplished so far in our church conversation. Based in part on this blog, Church Sweet Home: A Renovation to Warm the Soul is the true story of how my husband I transformed a 126-year-old Methodist church into our dream home. It came out in 2020.

Find it on Amazon or Barnes & Noble.

Our favorite before and after transformations

Before and after photos are satisfying. In the same minute, you see the agony of the mess along side its potential: the thrill of victory. Plus, there’s a little spot-the-difference mystery. Is that really the same person/pantry/porch/plastic surgery patient?

But I think the subject of the before and after photos finds them even more satisfying than just any old viewer. Because they know the work that came between the before and the after. As I prepare to launch Church Sweet Home, the memoir based on this blog that has depended heavily on the power of transformation, Tyler and I have been reflecting on our favorite before-and-afters of our church conversion project.

Tyler’s favorite before and after transformation is so obscure, I haven’t shared photos of it until now (and it wasn’t easy finding these shots among the 10,000 photos I took of the renovation). His favorite transformation is the back egress.

Here’s the before:

Back Egress BEFORE
BEFORE: This little lean-to covered the stairway to the basement of the church.

Originally, the only back door in the church was below ground level. This would never do for Tyler’s vision, which included an attached garage. We needed to get from the garage into the house without having to go through the basement. This transformation required many things: relocating the wires that anchored the power pole, jack-hammering the concrete steps to reroute them inside the garage, building a garage, removing the lean-to, cutting a doorway, and building a walkway over the stairway.

This walkway is what Tyler is most proud of—that he thought of it at all and figured out a way to make it happen. The walkway could have been built of wood, but its depth would have intruded on the headroom over the stairway. Instead, he had a steel fabricator make a bridge that was inches shallower but still strong enough to convey a person over the stairway.

Back Egress AFTER
AFTER: The basement stairway, formerly enclosed in the lean-to, now turns into the garage. The steel bridge is hidden behind in the wooden steps leading to the back door.

Here’s a look at the before-and-after from inside the church:


A closet originally filled the space where the back door was cut.

Now my favorite transformation: the headboard in the master bedroom.

MASTER BEDROOM BEFORE
BEFORE: The space that would be the master bedroom had a wall cutting through the middle. That wall (just two-by-four stumps in this picture) was built in the late 20th century, we think.

Tyler built a new wall on the right side of the window seen above. Then he and my stepson built a half-wall, an idea for a headboard that I saw on an episode of Fixer Upper. Tyler then created a feature by nailing on wood we salvaged from the basement. It came in a rainbow of distressed colors; all it needed was a couple of coats of clear polyurethane.

MASTER AFTER

The headwall was dressed up with some church-window wall art on the shelf.  The space is lit with chandeliers we found in storage when we demoed the church. I cleaned them up, spray-painted them and lit them with new lightbulbs. Tyler tracked down a couple of old bank safes on Craigslist, and they became our nightstands.

Moody Master AFTER
A moodier look.

The room also has a tray ceiling. Rope lighting is tucked inside, and Tyler can change the color of the lighting with his smart phone. Very romantic! This before and after is my favorite because it’s just so pretty.

If you’re a fan of before and after transformations, check out the Before & After tab on the blog for lots of satisfying projects we accomplished around the church.

CSH Book Front Cover Only# # #

My memoir Church Sweet Home: A Renovation to Warm the Soul comes out May 5. Preorder the ebook at Amazon Kindle and Barnes & Noble Nook.

Sometimes the most productive thing you can do is relax

Before I move along to the east side of the fireplace, let’s make a quick stop in front of the fireplace.

(Feel like you’re joining the conversation mid-stream? I’m sharing how the back wall of my great room in the converted 127-year-old church turned out. Check out this post to read about the pantry and this post to read about the left side of the fireplace.)

I wanted to create a little conversation area in front of the fireplace, but Tyler and I struggled to find the right chairs. They needed to be comfortable and low profile in order to clear the spiral stair on the left side of the hearth. Oh, and the right color—not too gray and not too splashy.

fireplace chair one
This photo makes the chair look beige, but it’s more caramelly than that.

We ended up choosing custom back-tufted caramel-colored leather chairs. And they swivel! Which is perfect for a guest who might want to warm up by the fire and then turn to enjoy the conversation.

We ordered them before Thanksgiving, and they weren’t delivered until February. It pained me to entertain at Christmas without them, but when they finally arrived, they were perfect.

The nailhead detail coordinates with the dark navy storage ottomans we found at another furniture store. Beside stashing our granddaughter’s random toys and books inside between her visits, the ottomans perform as footrests and drink rests, as needed.

fireplace chairs
You can see a peek of the right side of the fireplace cabinetry.

The whole setting is arranged on the faux bear rug Tyler found online (no bears were killed in the making of this rug—read about it here).

(I’ll share another picture of the right side of the fireplace later this week.)

50 shades of grey? Try hundreds

Our story so far: Analysis paralysis had descended upon the church renovation project, especially when it came to choosing paint colors.

# # #

color story
Paint chip mania!

Way back in the autumn when I’d created my design template for the project, I’d chosen a limited palette of about eight colors to guide my choices, but anyone who’s considered painting their trim beige knows there are about a hundred different shades of beige from unbleached silk to khaki.

In any other house I’d owned, I (or my husband) painted every room a different color. Isn’t that what everyone does? But in every other house I’d owned, paint color was usually the most distinctive design feature of the room. In the church, I had all kinds of other distinctive features vying for attention—etched windows, high ceilings, a dramatic spiral stairway, original wood floors. I decided I didn’t need a bunch of different paint colors muddying up the canvas. As we approached the painting phase of renovation, I’d settled on creamy beige for the trim and medium gray for the walls. All the trim. And all the walls. I wanted to paint every room in the same colors to create a cohesive backdrop to everything else going on. Now I’m not sayin’ I didn’t vacillate about this decision. Of course I did. Especially when it came down to choosing which creamy beige and which medium gray.

A trio of girlfriends came to have a look at the church in person (oh, and catch up, too—we did talk about subjects other than the one that obsessed me). While they were there, I pulled the paint chips I had been pondering back at the rental house into the great room for the first time.

And I simultaneously realized that not only would I have to coordinate trim and wall colors with the ceiling color I already had, I would have to think about my kitchen cabinets (which came in two colors).

And my fireplace stone.

And the floor stain.

Yes, I confess I had been dreaming of creamy beiges and medium grays in the form of tiny paint chips in a vacuum far removed from the church. Probably not wise. As soon as I held my creamy beige up to the off-white kitchen cabinets, I realized my creamy beige was yellow.

Blech! Yellow was not in the design scheme. Oh, how narrow the line between creamy beige and yellow! (I will note, for the record, I was once an ardent fan of yellow. I painted the office in my last home yellow—even the ceiling!)

desk-doorway-after-e1382649308305
The office in our former house was painted three shades of yellow. It was bright and cheerful, but a little intense.

# # #

Tomorrow: Time to pull out a paintbrush. See what transpires here.