“And what is so rare as a day in June? Then, if ever, come perfect days,” opined poet James Russell Lowell. Perfect days, I think, for a little outdoor project.
BEFORE
I painted a couple of beat-up chairs on just such a day last year. We found the chairs in our former rental house, and the property manager told us when we moved in, “They’re yours now!” One chair had been sitting outside through many rain storms from the looks of it. The seat had a crack in it. The other was stashed in the basement, covered in cobwebs. But whenever I encounter solid wood furniture that has seen better days, I see a potential paint project.
AFTER
I sanded these beauties and swished on a couple of coats of Fusion paint. First the back spindles were painted in Sterling gray and then the rest of the chairs was painted in Raw Silk. I find the subtle contrast of two similar colors preferable to more dramatic color choices, but you do you.
The chairs now sit in front of my desk in the upstairs bedroom/office.
I draped a quilt top on one of the chairs. The unfinished quilt top was gifted to me from a former parishioner who believed it belonged in the church. It is quite old, I’m guessing from the early 20th century, and each of the white blocks features the name of a woman (and a few men) who belonged to the Methodist congregation at the time. I agree with my benefactor: the memento belongs here.
As I have mentioned many times here, I am repeatedly impressed with the way a couple coats of paint can improve a hunk of wood. The hardest part is the waiting between coats, and even that’s not so difficult when you can enjoy June’s gentle breezes.
Before and after photos are satisfying. In the same minute, you see the agony of the mess along side its potential: the thrill of victory. Plus, there’s a little spot-the-difference mystery. Is that really the same person/pantry/porch/plastic surgery patient?
But I think the subject of the before and after photos finds them even more satisfying than just any old viewer. Because they know the work that came between the before and the after. As I prepare to launch Church Sweet Home, the memoir based on this blog that has depended heavily on the power of transformation, Tyler and I have been reflecting on our favorite before-and-afters of our church conversion project.
Tyler’s favorite before and after transformation is so obscure, I haven’t shared photos of it until now (and it wasn’t easy finding these shots among the 10,000 photos I took of the renovation). His favorite transformation is the back egress.
Here’s the before:
BEFORE: This little lean-to covered the stairway to the basement of the church.
Originally, the only back door in the church was below ground level. This would never do for Tyler’s vision, which included an attached garage. We needed to get from the garage into the house without having to go through the basement. This transformation required many things: relocating the wires that anchored the power pole, jack-hammering the concrete steps to reroute them inside the garage, building a garage, removing the lean-to, cutting a doorway, and building a walkway over the stairway.
This walkway is what Tyler is most proud of—that he thought of it at all and figured out a way to make it happen. The walkway could have been built of wood, but its depth would have intruded on the headroom over the stairway. Instead, he had a steel fabricator make a bridge that was inches shallower but still strong enough to convey a person over the stairway.
AFTER: The basement stairway, formerly enclosed in the lean-to, now turns into the garage. The steel bridge is hidden behind in the wooden steps leading to the back door.
Here’s a look at the before-and-after from inside the church:
BEFORE
AFTER
A closet originally filled the space where the back door was cut.
Now my favorite transformation: the headboard in the master bedroom.
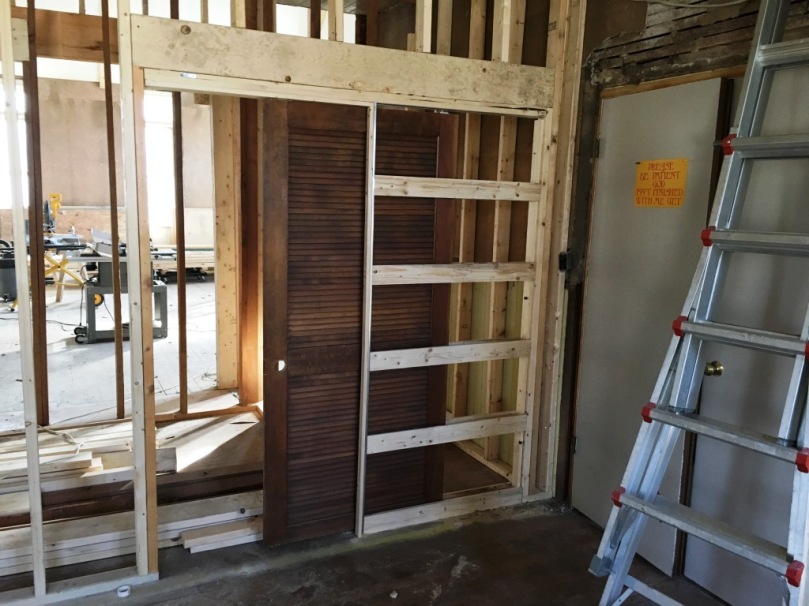
BEFORE: The space that would be the master bedroom had a wall cutting through the middle. That wall (just two-by-four stumps in this picture) was built in the late 20th century, we think.
Tyler built a new wall on the right side of the window seen above. Then he and my stepson built a half-wall, an idea for a headboard that I saw on an episode of Fixer Upper. Tyler then created a feature by nailing on wood we salvaged from the basement. It came in a rainbow of distressed colors; all it needed was a couple of coats of clear polyurethane.
The headwall was dressed up with some church-window wall art on the shelf. The space is lit with chandeliers we found in storage when we demoed the church. I cleaned them up, spray-painted them and lit them with new lightbulbs. Tyler tracked down a couple of old bank safes on Craigslist, and they became our nightstands.
A moodier look.
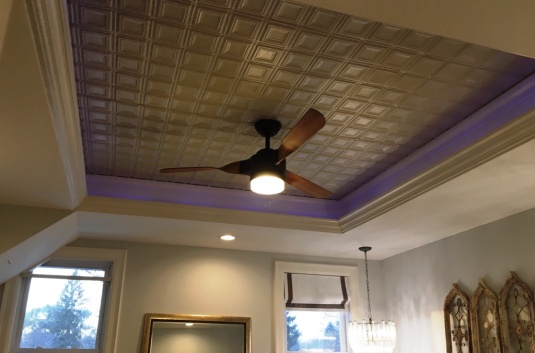
The room also has a tray ceiling. Rope lighting is tucked inside, and Tyler can change the color of the lighting with his smart phone. Very romantic! This before and after is my favorite because it’s just so pretty.
If you’re a fan of before and after transformations, check out the Before & After tab on the blog for lots of satisfying projects we accomplished around the church.
# # #
My memoir Church Sweet Home: A Renovation to Warm the Soul comes out May 5. Preorder the ebook at Amazon Kindle and Barnes & Noble Nook.
Nothing satisfies one’s desire to close the circle like a few good before-and-after photos. Let’s be honest: It’s why HGTV is even a thing and the only reason Biggest Loser was worth following for 12 episodes a season.
If you followed this blog from the beginning, you’ve enjoyed a lot of before-and-after photos. But if you tried to describe the experience to someone with less fortitude (or interest), it was hard to get to the good stuff. With that in mind, I’ve created a new page on the blog with just the “good stuff”: A page with only before-and-after photos of our project.
If that’s your thing (or you’re trying to show someone what that crazy 50something couple in Wisconsin accomplished), check out the Before & Afters page. You can click here or just go to the Home Page and look for “Before & Afters” tab.
Among the projects we raced to finish in time to show off to our guests at the holidays was the entryway to the church. We were, of course, able to move in months ago without having to finish the space (only the ceiling was done), but since it was the first impression (or second, if you took in the exterior of the church first), we wanted it to be finished.
Which meant a flurry of activity took place in late November and early December. You-Can-Call-Me Al, who had tiled our shower and kitchen back splash, tiled the ground-level entry floor. Then he built new wooden treads for the steps leading up into the sanctuary and stained them. St. Johnny spent hours sanding the sanctuary level landing; it was a bear, covered in decades of paint and mastic and gunk. We decided to keep it rustic, leaving some of the paint intact, and we stained over it. Finally, we had the walls, trim and interior doors painted, hung the new chandelier and had our wrought iron team install the railing.
The transformation of the space is significant.
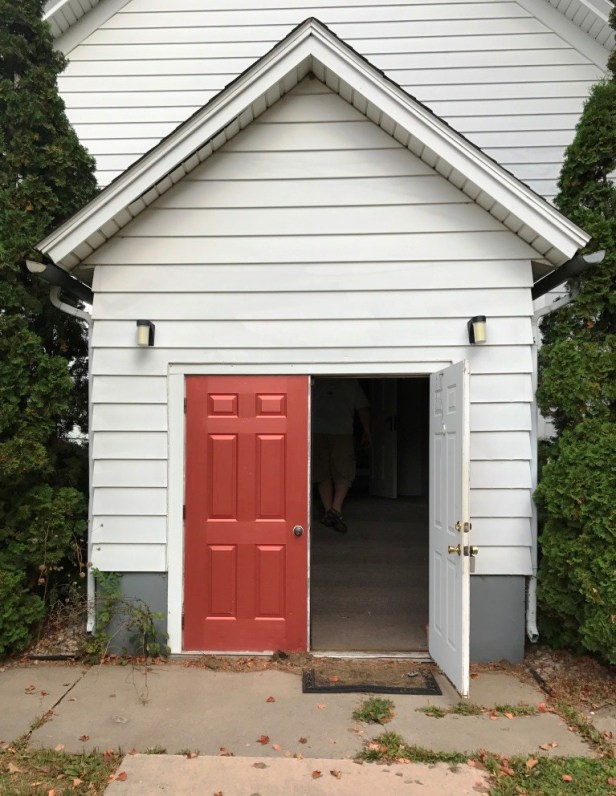
But let’s begin with a look at how the front doors looked when we bought the church a year ago. I’ve shared this shot before, but it’s a good taste of all the “befores” of the church (and who doesn’t appreciate a good transformation story, especially at this time of year?).
The front door was functional, but it had been stripped of a lot of its charm when the congregation replaced the original French doors with industrial red ones. The red ones were certainly more sound than the French doors, which had been stored and were so rotted when we found them, we left them on the curb because we didn’t think we could restore them. Also, the tiny lights on either side of the door may have provided illumination, but they fell short in the distinctive category.
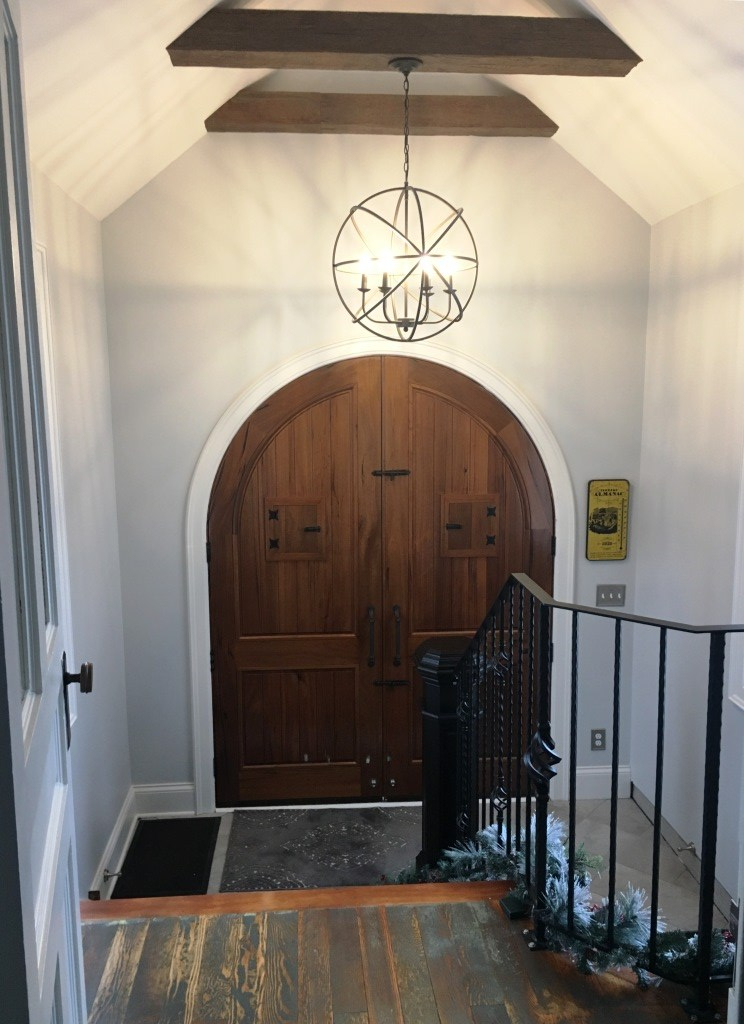
Here’s how our Church Sweet Home presents its entryway now.
Those magnificent castle doors are a lot more interesting, and the light fixtures flanking them say a lot more than simply, “Let there by light.” Tyler rubbed a coat of tung oil into the doors in December to deepen their beauty and rub out all the nicks and scratches they had endured during construction and move-in.
Which brings me to the secondary purpose of today’s post: To call out the artisans who created our beautiful house numbers. Zach and Sheena’s work at TheWoodsCollective was featured in an issue of HGTV Magazine, and when I saw it, I wanted it for our church.
This is exactly the type of custom feature perfect for an Etsy vendor because everyone appreciates choosing their own wood finish and number style, and every house requires different numbers.
OK, back to our entryway tour. Here’s how our entryway behind the door looks now.
Welcome! Come on in!
See that door bell button there on the right? When you push it, it rings like a church bell inside the church. It’s awesome!
Let’s take a look at some before and after photos.
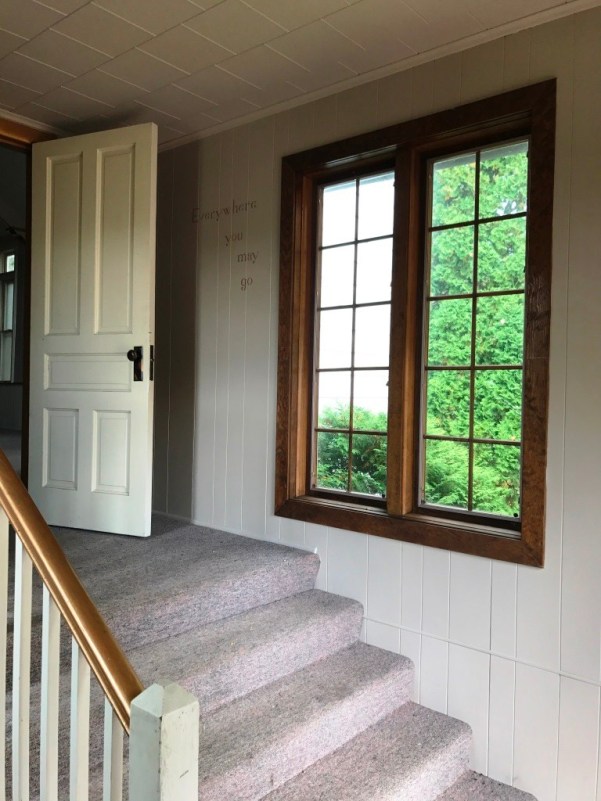
When we purchased the church, the ceiling was flat across the top with tiles, the walls of the entryway were paneled, and the steps were carpeted. The railing was distinctive, but made of wood, which didn’t match the rest of the new railings we eventually installed inside.Here’s how the steps up into the sanctuary look now.
Perhaps the most distinctive feature of the entryway now is that newel post. Tyler found it on Craig’s List and sent me two hours south to retrieve it. It’s solid wood, salvaged from a mansion in Chicago, and very heavy. The guy who sold it to us had multiple storage units filled with various pieces of mansions and churches–doors, altars, stained glass windows, hutches, and more. When I got the post back here, Tyler cut a few inches from the bottom to make it fit, and it was not easy task to cut a 10-and-a-half-inch column of wood.
Ah, I remember well the sawdust era of construction.
The guys at the spiral stairs manufacturer, who built all our railings, painted the newel post to match our steel, and then built the railing to fit it.
The stairs down to the basement are not so grand as the “up” steps, at least for now. Tyler painted them a nice blue-gray. At least the carpet is gone.
Before
After
When we bought the church, I appreciated the message inside the front doors …
Go now in peace
… but I like our new light fixture now.
The black steel light fixture coordinates with our railing, and the ceiling beams are the same as we have inside the sanctuary.
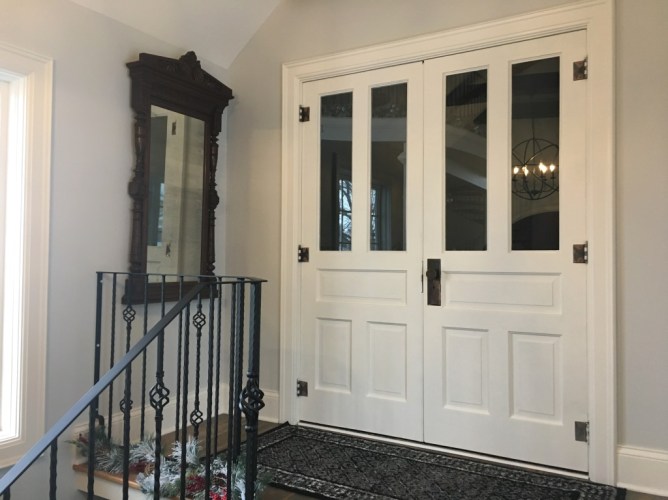
And, though I don’t have a good before of this angle, here’s a look at our Mirror, Mirror, On The Wall. Tyler found this ornate mirror at an estate sale about a week after we decided to buy the church. Now, when you enter or leave the house, you can gaze as your reflection and ask, “Who’s the fairest of them all?”
These interior doors are original to the church (or at least when we purchased it). We put in the glass panels and repainted the wood, and they look good as new.
I had intended to put a half-circle marble shelf beneath the mirror, but it turns out there’s no way to secure it, so we are looking for a little table to go there.
There you go, our renovated entryway to Church Sweet Home. Now you can go in peace.
Dear reader, we’re taking a break from the memoir-in-progress to assess the accomplishments of the past year. My husband and I closed on the 126-year-old Methodist church just shy of a year ago, and the changes have been immense. For the next week or so, I’m going to tell the story in before-and-after photos. Whenever possible I’ll try to use the same perspective in the “after” shot as I did long ago in the “before.” Today, we look at the master bedroom.
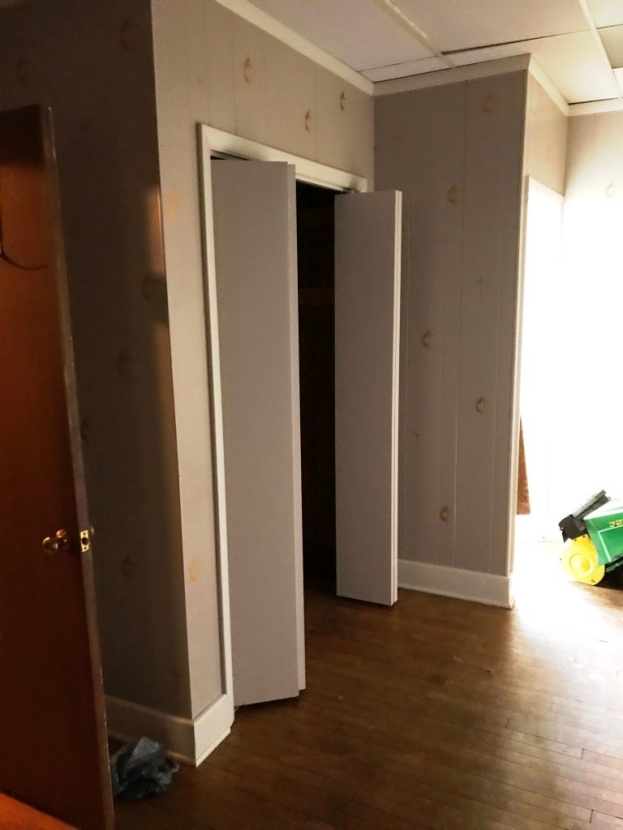
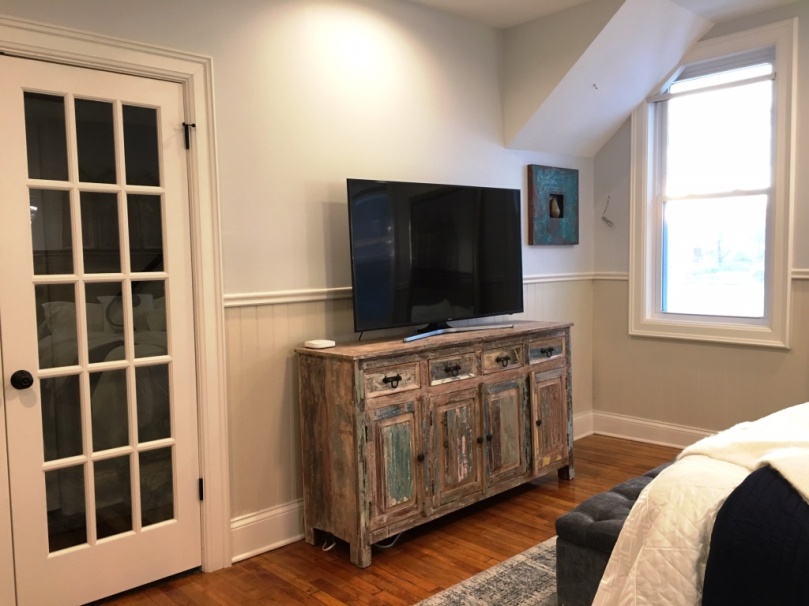
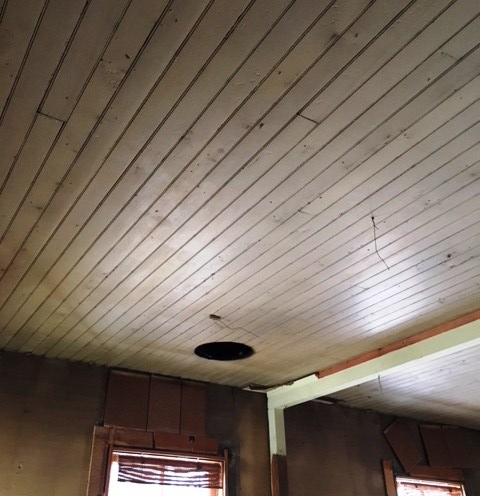
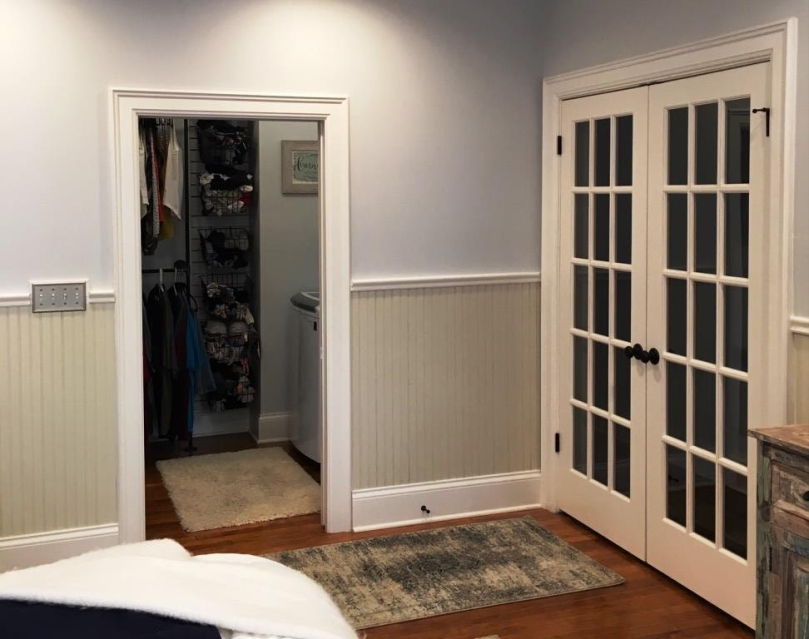
I’ve shown off pictures of the headboard side of the master bedroom before; that side didn’t exist when we purchased the church. Today, we look at the south side of the bedroom. When we purchased the church, there was an exterior stairway and doorway and a closet on this side of the room. Both were removed.Removing the doorway revealed the window. A TV on an imported cabinet now sits where the closet used to be. The foot of the bed is just showing in the bottom right.Initially, I wanted to show off the wood slats of the original ceiling in the master bedroom, but there were too many holes.So we repurposed the tin ceiling from the basement inside the tray ceiling. I love looking up at this ceiling when I’m in bed. Tyler says it’s a good think I like it because it was a lot of work.This is look mid-construction of the east side of the master bedroom. This is the pocket door leading to the closet.Here’s a look at the east side of the master bedroom now, complete with French doors.
Dear reader, we’re taking a break from the memoir-in-progress to assess the progress we’ve made during the past year. My husband and I closed on the 126-year-old Methodist church just shy of a year ago, and the changes have been immense. For the next week and half or so, I’m going to tell the story in before-and-after photos. Whenever possible, I’ll try to use the same perspective in the “after” shot as I did long ago in the “before.” Yesterday, we drove up to see the church, and today we prepare to enter the front door.
The front entryway of the church was added in the 1940s (for decades previous to that, parishioners entered through a doorway beneath the belfry). Glassed French doors were replaced at some point with the industrial red doors we found when we checked out the church a year ago.The front doors today.
Today’s headline is a partial quote from actress Elizabeth Taylor. Her full quote is, “I feel very adventurous. There are so many doors to be opened, and I’m not afraid to look behind them.”
Tomorrow: The entryway is not yet finished, so we’re skipping to the sanctuary. Check it out here.
Our story so far: My husband and I purchased a 126-year-old Methodist church, demolished the interior and rebuilt it back into our dream home.
# # #
Chapter 44
My sister, who followed my every move on Facebook with enthusiasm (like a good sister should), had been privy throughout the construction of the church to a string of secret pictures and previews. Frequently, she implored: “More pictures.” So I obliged. It was easy, thanks to Verizon and smart phones. When we talked, the church and our work was all I could prattle about.
But until October, she and her family hadn’t seen any of it in person. She and my brother-in-law were busy people, parents to three busy boys, and they lived seven or eight hours north of our little renovation project. Finally, a long weekend break—and the prospect of an operational bathroom and guest bed—offered the perfect opportunity for four of them—my oldest nephew was off to college—to pay us a little visit.
Sister came bearing more of Dad’s homegrown apples and an obscene amount of Halloween candy. And gushing. Lots of gushing. Music to my ears. Even the fifteen-year-old, who probably couldn’t care less about Auntie’s crazy church house, was complimentary. And my ten-year-old—a doll! He carved a Halloween jack-o-lantern to decorate my church sign.
But despite the string of pictures I’d shared with her, few of them were “before” shots. Nothing to brag about there. After seeing our work in all its semi-finished glory, she wanted to be reminded of how far we’d come, so I dragged her up to my office and took her down memory lane with a slide show on my computer. Printed photos? So last century. Check out these pixels of dust, paneling and old carpeting. This is what this place used to look like.
# # #
Dear reader, I’m going to take this opportunity to remind you of how far we’ve come in a year. Tyler and I closed on the old church just shy of a year ago, and the changes have been immense. So for the next 10 days or so, I’m going to take a break from the memoir-in-progress and tell the story in before-and-after photos. Whenever possible, I’ll try to use the same perspective in the “after” shot as I did long ago in the “before.”
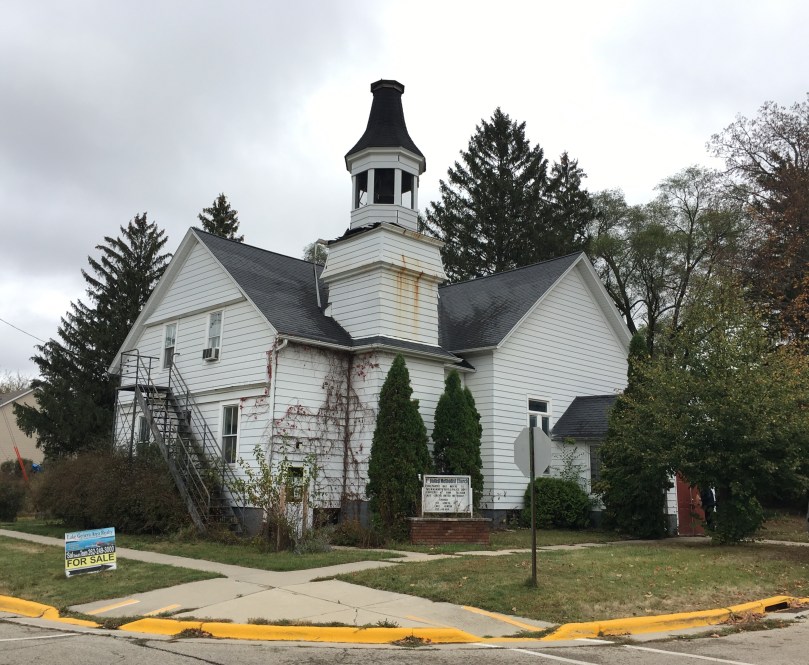
Let’s begin with a look at the church as you drive up:
Before: This image was taken when the church was still for sale, in September 2017.This image was taken this morning as a light snow was falling.


 # # #
# # #